
DIY Chick Brooder Box
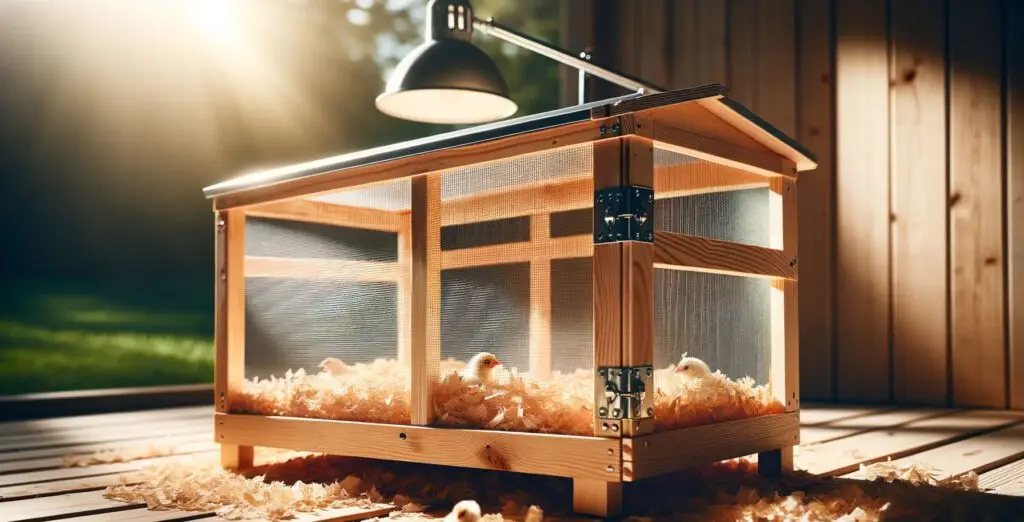
If you are new to backyard chicken farming, the thought of raising baby chicks at home may be intimidating. However, watching your babies grow from fuzzy hatchlings to full-grown birds is rewarding. Making the process more rewarding is building your own DIY chick brooder. It only takes a few materials and basic woodworking skills to create a safe, cozy place for your hatchlings to thrive. In this guide, you will find step-by-step instructions for making a wooden brooder box, perfect for nurturing your newest arrivals. How to Build a Wooden Chick Brooder: Step-by-Step Guide Materials Needed: Plywood or lumber for the sides, bottom, and lid Screws or nails Hinges Saw Screwdriver or hammer Drill (optional) Hardware cloth for ventilation Chicken wire (optional) Wood glue (optional) Step 1: Cut the Wood Measure and cut the plywood or lumber to the desired dimensions for the sides, bottom, and lid of the brooder. Typical dimensions for a small brooder might be around 24 inches by 36 inches for the base, with sides around 12 inches high. Step 2: Assemble the Box Begin by attaching the sides to the bottom piece using screws or nails. Ensure they are flush at the corners. If desired, apply wood glue along the edges for extra strength before screwing or nailing them together. Once the sides are attached, add the lid by attaching hinges along one edge of the top piece and the corresponding edge of the back side. Step 3: Add Ventilation Using a saw or drill, cut ventilation holes in the sides of the brooder. These holes should be covered with hardware cloth to prevent chicks from escaping and predators from entering. Instead of holes, you can leave the sides of the brooder box open and cover the opening with hardware cloth. Alternatively, you can use chicken wire for ventilation, but ensure the holes are small enough to prevent chicks from escaping. Step 4: Finishing Touches Sand any rough edges to prevent splinters. Apply paint or sealant to the exterior of the brooder to protect the wood from moisture and extend its lifespan. Add bedding material to the bottom of the brooder, such as pine shavings or straw, to provide a comfortable surface for the chicks. Step 5: Prepare for Use Set up a heat lamp or heating pad inside the brooder to maintain the chicks’ temperature. Place feeder and waterer inside the brooder, ensuring they are easily accessible to the chicks. Monitor the temperature and adjust the heat source as needed to keep the brooder warm but not too hot. Step 6: Maintain and Clean Regularly clean the brooder by removing soiled bedding and replacing it with fresh material. Check the ventilation holes regularly to ensure they remain clear and unobstructed. As the chicks grow, you may need to adjust the size of the brooder or move them to a larger space. Following these step-by-step instructions, you can quickly build a wooden box brooder to raise baby chicks at home. Your newfound DIY skills helped you create a nurturing environment for baby chicks to grow and flourish. Your DIY chick brooder box helps you regularly monitor the chick’s well-being to adjust the temperature and maintain the box’s cleanliness as needed. As your baby chicks grow, you can easily expand and upgrade their living quarters. Enjoy knowing you’ve provided a warm, secure home for current and future flocks.
Upcycled DIY Chick Brooder
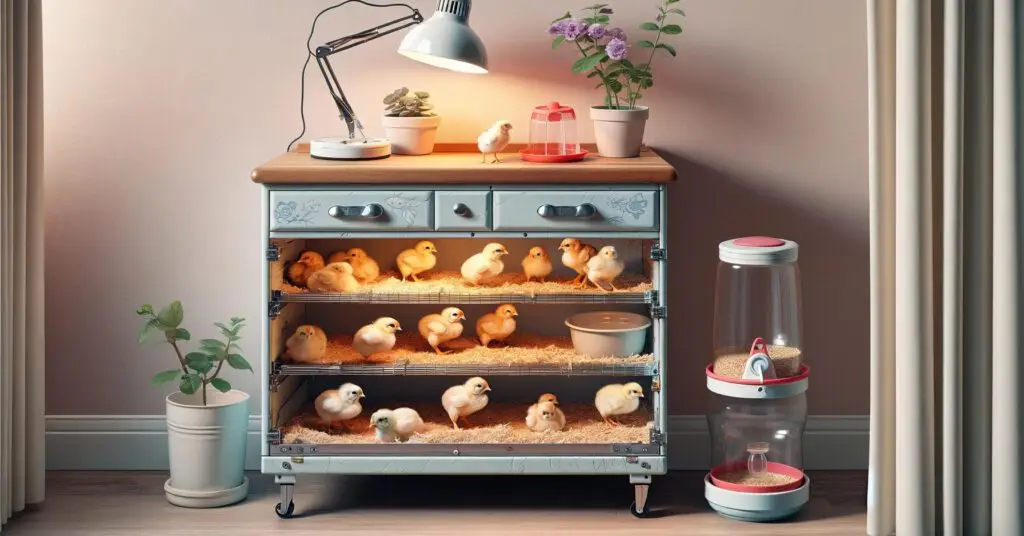
Welcome to the world of sustainable chick-rearing. If you’re looking for a creative and eco-friendly way to give your baby chicks the best start in life, you’ve come to the right place. Unlike building the chick brooder in our DIY Chick Brooder post, this upscaled chick brooder shows you how to transform a used kitchen cabinet into a cozy brooder for your baby chicks. Our upscaled chick brooder gives new life to old materials and provides a safe and comfortable environment for your chicks to thrive. Let’s dive into the step-by-step instructions and get started on this exciting DIY project. How to Build an Upcycled Brooder from a Used Kitchen Cabinet Looking for an eco-friendly way to raise baby chicks at home? Consider repurposing a used kitchen cabinet into a brooder! Follow these step-by-step instructions to create a cozy and sustainable space for your feathered friends: Materials Needed: Used kitchen cabinet Box cutter or jigsaw Hardware cloth or mesh for ventilation Heat lamp or heating pad Feeder and waterer Step 1: Choose a Suitable Cabinet Select a used kitchen cabinet that is large enough to accommodate the number of chicks you plan to raise. Ensure the cabinet is sturdy and has solid walls to provide adequate insulation and protection for the chicks. Step 2: Prepare Ventilation Holes Use a box cutter or jigsaw to carefully cut ventilation holes along the sides of the cabinet. Ensure the holes are evenly spaced and large enough to allow for proper airflow while preventing chicks from escaping. Step 3: Install Ventilation Mesh Cut pieces of hardware cloth or mesh to fit over the ventilation holes. Secure the mesh in place using screws or adhesive, ensuring it covers the holes completely to prevent chicks from escaping. Step 4: Create an Access Door Determine where you want the access door to be located on the cabinet. Use a box cutter or jigsaw to carefully cut out a rectangular door, leaving enough space for chicks to enter and exit. You can also repurpose one of the existing cabinet doors as the access door. Step 5: Set Up Heat Source Place a heat lamp or heating pad inside the cabinet to provide warmth for the chicks. Position the heat source at one end of the cabinet to create a temperature gradient, allowing chicks to regulate their body temperature as needed. Step 6: Add Feeder and Waterer Place a feeder and waterer inside the cabinet, ensuring they are easily accessible to the chicks. Fill the feeder with chick starter feed and the waterer with clean, fresh water. Step 7: Monitor Temperature and Humidity Use a thermometer to monitor the temperature inside the brooder, aiming for a temperature of around 95°F (35°C) for newly hatched chicks. Keep the brooder in a draft-free area and adjust the heat source as needed to maintain a consistent temperature. Monitor humidity levels using a hygrometer and adjust as necessary to keep chicks comfortable. Step 8: Regular Maintenance Clean the brooder regularly by removing soiled bedding and replacing it with fresh material. Monitor chicks for signs of illness or stress, and provide appropriate care as needed. As the chicks grow, gradually increase the size of the brooder or move them to a larger enclosure. Following these step-by-step instructions, you can easily create an upcycled brooder from a used kitchen cabinet to raise baby chicks at home. Final Thoughts With your upcycled kitchen cabinet brooder complete, you’re ready to embark on a rewarding journey of chick-rearing. You’ve created a sustainable and functional space for your baby chicks to grow and flourish by repurposing materials and tapping into your creativity. As you watch your chicks thrive in their new home, take pride in knowing you’ve contributed to their well-being and the planet’s health.
DIY Plastic Bin Brooder
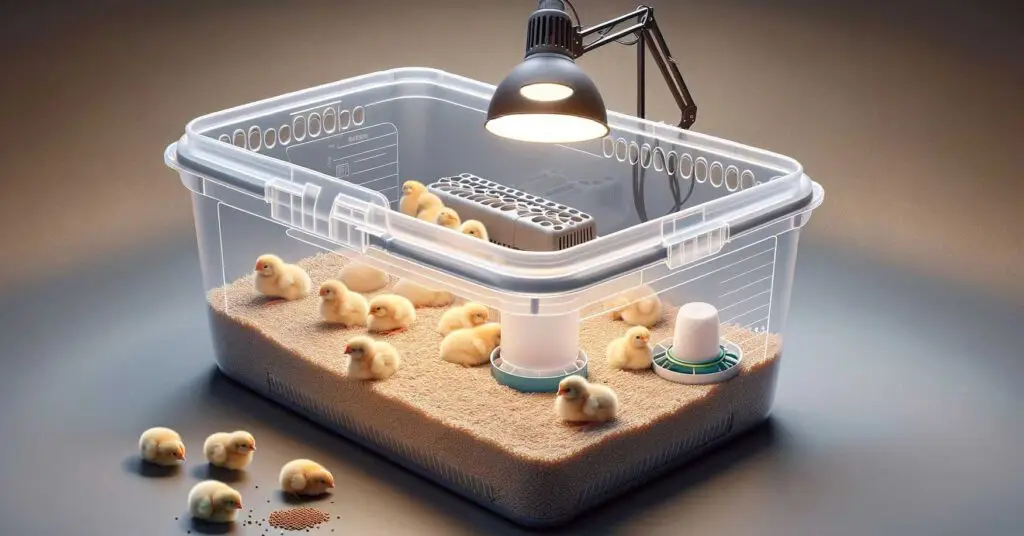
https://thebackyardchickenfarmer.com/diy-chick-brooder-box/Below are step-by-step instructions for building a simple plastic bin brooder: How to Build a Simple Plastic Bin Brooder for Baby Chicks Raising baby chicks at home can be a rewarding experience, and having the right brooder setup is essential for their health and well-being. Follow these step-by-step instructions to create a simple plastic bin brooder: Materials Needed: Large plastic storage bin with a lid Drill Jigsaw or utility knife Hardware cloth or mesh for ventilation Heat lamp or heating pad Feeder and waterer Step 1: Choose the Right Bin Select a large plastic storage bin with enough space to accommodate the number of chicks you plan to raise. Ensure the bin has a secure lid to prevent chicks from escaping and to retain heat. Step 2: Prepare Ventilation Holes Use a drill to make ventilation holes along the sides of the bin, spaced evenly to provide adequate airflow. Ensure the holes are large enough to allow for proper ventilation but small enough to prevent chicks from escaping. Step 3: Cut an Access Door Determine where you want the access door to be located on the bin. Use a jigsaw or utility knife to carefully cut out a rectangular door, leaving enough space for chicks to enter and exit. If desired, attach hinges and a latch to the door to make it easy to open and close. Step 4: Install Ventilation Mesh Cut pieces of hardware cloth or mesh to fit over the ventilation holes. Secure the mesh in place using screws or adhesive, ensuring it covers the holes completely to prevent chicks from escaping. Step 5: Set Up Heat Source Place a heat lamp or heating pad inside the bin to provide warmth for the chicks. Position the heat source at one end of the bin to create a temperature gradient, allowing chicks to regulate their body temperature as needed. Step 6: Add Feeder and Waterer Place a feeder and waterer inside the bin, ensuring they are easily accessible to the chicks. Fill the feeder with chick starter feed and the waterer with clean, fresh water. Step 7: Monitor Temperature and Humidity Use a thermometer to monitor the temperature inside the brooder, aiming for a temperature of around 95°F (35°C) for newly hatched chicks. Keep the brooder in a draft-free area and adjust the heat source as needed to maintain a consistent temperature. Monitor humidity levels using a hygrometer and adjust as necessary to keep chicks comfortable. Step 8: Regular Maintenance Clean the brooder regularly by removing soiled bedding and replacing it with fresh material. Monitor chicks for signs of illness or stress, and provide appropriate care as needed. As the chicks grow, gradually increase the size of the brooder or move them to a larger enclosure. Following these step-by-step instructions, you can easily build a simple plastic bin brooder to raise baby chicks at home. Or, if you want something a little fancier, try my easy DIY chick brooder.
Feeding Chickens for Better Health and Better Eggs

Disclosure: This post may contain affiliate links. If you purchase through these links, I may earn a small commission at no extra cost to you. New chicken keepers tend to overthink feeding. They buy expensive supplements, specialty feeders, and bags of products they’ll never finish. The only three things your chickens need are food, water, and shelter. You don’t need a fancy gravity feeder. Just a dish that is deep enough to stay upright and keeps birds from walking through it. Chickens are simple creatures. There is no need to get fancy. But simple doesn’t mean dump a bag of commercial feed and forget it. And actually, you might only use commercial feed to supplement their diet and not be the main factor. Those rich orange yolks that people associate with farm-fresh eggs don’t come from grain pellets alone. They come from a varied diet of greens, insects, kitchen scraps, and yes, some commercial feed when the season calls for it. What your chickens eat shows up directly in the quality of their eggs and their long-term health. Five Dietary Essentials Chickens are natural foragers, and when left to roam, they’ll eat insects, worms, grass, seeds, and just about any green thing they find. As a chicken parent, your job is to mirror that variety, even if your birds spend most of their time in a run. Five categories cover what every laying hen needs to stay healthy and to continue producing eggs worth eating. Protein Egg production runs on protein. Free-range chickens get plenty from worms and insects while foraging. When foraging isn’t an option, especially in winter, you’ll need to fill the gap. Mealworms and crickets are a great alternative. Fish oil and fish meal are good year-round supplements. If you garden, chickens love those big, fat, green tomato worms you pick from your plants during the summer. One thing to avoid is feeding your chickens raw meat, as it can trigger cannibalistic behavior in the flock. Greens One of the best-kept secrets to great-tasting eggs is greens—lettuce, kale, beet greens, carrot tops, whatever leafy scraps come out of your kitchen. Grocery stores and farmers’ markets often toss produce that’s wilted but still fine for chickens. Ask around. We have arrangements with some of the restaurants close to us to save their vegetable scraps for our girls. Neighbors with gardens are another good source. The more greens your flock eats, the richer and more nutritious the eggs. Grass and hay We keep one of our compost piles inside the chicken run. Our birds do half our work by turning it while eating bugs and plant matter from the pile. Standard composting takes close to a year. Chickens cut that to 4 to 6 months, and they mix their own fertilizer in as they go. It’s free labor and good nutrition at once. Dried Corn and grains Use these as a supplement, not a main course. A little whole corn adds richness to the yolk. Scatter a handful in the yard and let the birds scratch for it. It doubles as a treat and a way to keep them active. We feed our chickens a small handful of corn or grains every other day, keeping it less than 10% of their diet. Since corn and grains are high in energy but low in protein, overfeeding may cause reduced egg production and obesity in your birds. Calcium Laying hens burn through calcium fast. If a hen doesn’t get enough, she will produce thin, brittle shells, and her health will suffer over time. Oyster shells from a feed store work, but eggshells are a free and natural alternative. More on that below. Water Matters More Than Feed This is the feeding topic most articles skip. A chicken that doesn’t have clean water won’t eat. A chicken that doesn’t eat stops laying. And since about half of an egg is water, egg production drops or completely stops. Eggs become smaller with weak or soft shells, and prolonged dehydration can cause permanent damage to a hen’s laying cycle. Chickens need a lot of fresh water, so keep it available all day, every day. In winter, move the waterer inside the coop to prevent freezing. I keep a waterer inside the coop and one outside year-round. In summer, check it twice a day. Birds dehydrate fast in heat. During the summer, we buy our girls watermelon. They love melon, and it helps ensure they stay hydrated. How to Feed Eggshells to Your Hens Feeding eggshells back to your flock is a practice that goes back centuries. If your hens eat mostly table scraps and foraged food rather than calcium-fortified commercial feed, they need extra calcium. We have a large flock, so we freeze-dry any eggs we don’t sell or give away. You can find out more about my home freeze dryer on The Prepper’s Basement. Will it turn them into egg eaters? Probably not. In the 20-plus years of raising chickens and feeding eggshells, I’ve had only two hens that ate their own eggs. If eggshells caused that habit, every hen in the flock would be doing it. The more common reason hens eat eggs is that they’re not getting enough calcium in the first place. There is a process for prepping egg shells for your hens. Collect and store As you use eggs, crush the shells roughly and toss them into a bucket. I keep mine in the pantry. Bake When the bucket is about half full, spread the shells on a baking sheet and bake at 350°F for 8 minutes. The heat kills bacteria and dries out the inner membrane, which makes the shells easier to crush. Crush Break the toasted shells into small pieces, roughly the size of glitter. Small enough that they don’t look like eggs. You don’t want a powder. You want tiny chips that a hen can pick up and eat. Serve separately Put the crushed shells in their own dish rather than mixing them into the
DIY Chick Brooder
Setting the stage for the healthy development of chicks requires a reliable and carefully constructed environment. This is where a chick brooder comes into play, serving as a warm, safe haven for baby chicks during their first weeks. Building a DIY chick brooder not only allows for customization to meet the specific needs of your flock but also instills a sense of accomplishment in providing for these young creatures. Why might you choose the DIY route for chick brooders? For starters, creating your own brooder can be cost-effective and allows the flexibility to use materials you already have. Additionally, by being involved in the design and construction process, you gain a deeper understanding of the chicks’ requirements, contributing to their overall health and vigor. A thoughtful approach to designing and setting up a baby chick brooder is critical for nurturing these young birds. The following section will dive into the necessary considerations and steps to plan your brooder. With a keen eye on crafting a comfortable environment, you’ll ensure the brooder meets the chicks’ warmth, safety, and space needs, setting the stage for their growth and well-being. With DIY, you’re not just building a physical space but laying the groundwork for the lives entrusted to your care. Planning Your Baby Chick Brooder Design Effective planning is the cornerstone of any successful project. Before I grab a hammer or cut a piece of wood, I carefully consider the dimensions, materials, and features that will ensure my chicks’ survival, comfort, and growth. When approaching the design of a baby chick brooder, consider the space needed, the materials at your disposal, and how you can create a healthy habitat. Space is paramount. I calculate the square footage by the number of chicks I intend to raise, typically allotting 2-3 square feet per chick to prevent overcrowding. For materials, sanitation, and safety guide, my choices are wood for the frame, washable and non-toxic surfaces for the interior, and sturdy, fine mesh for ventilation. Temperature regulation can’t be an afterthought—it’s crucial. A brooder’s design must allow for a reliable heat source, which must be adjustable as the chicks develop their feathers. Draft protection is equally important, ensuring the chick’s environment remains stable. Integrating these elements from the get-go saves time and stress down the line. ? Brooder Building Supplies ? Large cardboard box or plastic tub Heat lamp or EcoGlow brooder Thermometer to monitor temperature Bedding material, such as pine shavings or straw Feeder and waterer appropriate for chicks Brooder guard or cover to contain heat Optional: chick starter feed and chick grit Brought to You by thebackyardchickenfarmer.com ? Step-by-Step Guide: How to Build a Chick Brooder Gather all necessary tools and materials before you start constructing your chick brooder. You’ll need a sturdy container, such as a plastic tub or a wooden box, a heat lamp, thermometer, pine shavings for bedding, a feeder, a waterer, and hardware cloth for a lid. The building process begins with creating a solid framework. This step may involve reinforcing the edges if needed for a plastic tub. If you’re using wood, cut your pieces to size and assemble using nails or screws to form a box. Remember, it’s imperative to sand down any rough edges to prevent injury to the chicks. Next, heat is crucial for baby chicks’ survival. Install the heat lamp securely above where your chicks will huddle, ensuring it’s adjustable. This allows you to modify heat levels by raising or lowering the lamp as required. Always affix it well to avoid falls, and pair it with a reliable thermometer to keep a consistent temperature between 95 and 100 degrees Fahrenheit in the brooder’s first week. Pour in the bedding, typically pine shavings, to a depth of approximately 1-2 inches. This bedding should be changed regularly to maintain hygiene. Set up the feeder and waterer in areas easily accessible to the chicks but far enough from the heat source to avoid warming the food and water. Safety is non-negotiable. Protect your brood by covering the brooder with hardware cloth or a similar lid that provides ventilation while keeping the chicks secure inside and potential predators out. Conduct a thorough check of your brooder to ensure it’s safe and ready for occupants. Watch for potential hazards like loose wires, sharp corners, or gaps through which chicks could escape. After ensuring everything is immaculate, introduce the chicks to their new home. Chick Brooder Building Plans By following these step-by-step instructions, you can easily build a simple wooden box brooder to raise baby chicks at home. Simple Wooden Box Brooder Materials Needed: Step 1: Cut the Wood Step 2: Assemble the Box Step 3: Add Ventilation Step 4: Finishing Touches Step 5: Prepare for Use As an Amazon Associate, I earn commission from qualifying purchases, which helps with website upkeep. Maintaining Your Baby Chick Brooder for Optimal Health Your DIY chick brooder is now a warm and secure home for the newest feathered additions to your family, but the job doesn’t stop there. Keeping these little ones thriving requires regular maintenance of their environment. Start with a daily inspection routine. You’re checking for cleanliness, food and water supply, and the general well-being of your chicks. Any mess should be cleaned promptly to prevent disease and keep the brooder sanitary. Temperature and humidity levels are critical for the health and comfort of baby chicks. Monitor these conditions closely, making minor adjustments to the brooder’s heat source to maintain a consistent environment. As your chicks grow, they’ll need more space and less heat. Be prepared to adjust your brooder setup accordingly, expanding the space and gradually reducing the temperature. Finally, you’ll encounter moments that require swift action – like a tipped-over water dish or a curious chick finding its way to an edge. Stay vigilant and correct these issues immediately to keep your brood safe. Final Thoughts Remember, the brooder is just the beginning. As your chicks develop, you’ll transition them to a chicken coop, but until then, your focus
Brooder Setup And Care For Baby Chicks
If you’re new to raising chickens, you might be surprised to learn how crucial the first few weeks of a chick’s life are. During this sensitive period, a well-prepared brooder serves as a temporary home where the baby chicks can stay warm, safe, and well-fed as they begin their journey to adulthood. A brooder is the chick’s first home; getting it right is critical. Imagine a cozy, well-appointed nursery, but for chicks. It’s here they’ll grow, develop, and require an environment that caters to their unique needs. These needs can be summed up into four essential components: a reliable heat source, appropriate bedding, adequate space, and safety. As a caring chick owner, the health and comfort of these young birds are in your hands. The brooder invests in their well-being and your flock’s future productivity and health. The extra effort now sets you up for fewer issues in the future. Remember, setting up a brooder goes beyond just buying and assembling parts. It’s about understanding the underlying whys and hows that will ensure your chicks thrive. Now, I’ll guide you through choosing and preparing a suitable brooder in the next section so your chicks can flourish from day one. Choosing and Preparing the Right Brooder Your choice of brooder sets the stage for the health and growth of your baby chicks. A brooder can be as simple as a cardboard box for small batches or a more elaborate setup for larger flocks. Commercial brooders come with all the bells and whistles but can be costly. On the other hand, a do-it-yourself (DIY) approach requires more hands-on setup but can be a cost-effective and rewarding experience. While it takes a time investment, building a brooder is not difficult, and many people find it a rewarding experience when preparing for their new chicks. It just takes some patience and requires an attention to detail. ? DIY Baby Chick Brooder ? Follow these steps to build your own DIY baby chick brooder: Choose a suitable container for your brooder, such as a large cardboard box or plastic tub. Ensure the brooder provides enough space for each chick to easily move around. Make sure the brooder is safe from any sharp objects or safety hazards. Ensure the brooder is easy to clean or discard, especially since chicks can be messy. Place a heat source, such as the EcoGlow, inside the brooder to keep the chicks warm. Provide easy access to food and water for the chicks. Brought to You by thebackyardchickenfarmer.com ? Cleanliness is paramount, even when all the materials are new. A thorough scrub with a disinfectant ensures your brooder is free from pathogens that can harm delicate chicks. Careful consideration of brooder placement is a necessary step. Place your brooder in a draft-free area where you can easily monitor and access it, yet out of reach from household pets and other potential dangers. Regular maintenance, including daily cleaning of equipment and bedding, is essential for preventing the build-up of harmful bacteria and maintaining a healthy environment. Adding a reliable heat source is one of the most crucial steps in brooder setup. The ambient temperature inside the brooder should be approximately 95 degrees Fahrenheit for the first week of life, then decrease the temperature by about 5 degrees each week afterward. Use a thermometer to monitor the temperature. Avoid temperature fluctuations, which can harm the chicks’ health and well-being. As an Amazon Associate, I earn commission from qualifying purchases which helps with website upkeep. The chicks’ transition to the coop is a significant milestone. As they feather out and grow, they’ll become more independent and capable of regulating their body temperatures. The ground rules you’ve set by choosing and preparing an appropriate brooder will impact their transition to the next phase of life. Daily Care and Monitoring of Your Baby Chicks Baby chicks require attentive daily care beyond just providing food and water. Your close observation and engagement are essential in fostering their health and happiness. Regularly checking on your chicks several times daily keeps you aware of their activity levels and behavior, which are strong indicators of their well-being. ? Daily Baby Chick Care ? Check and refill waterers and feeders to ensure your chicks have access to clean water and fresh feed. Monitor the temperature in the brooder and adjust the heat source as needed to keep the chicks warm. Observe the chicks for any signs of illness or distress, such as lethargy or abnormal behavior. Provide enrichment activities, such as dust baths or hanging treats, to keep the chicks entertained and stimulated. Keep the brooder clean by removing any soiled bedding and replacing it with fresh bedding. Handle the chicks gently and avoid stressing them unnecessarily. Interact with the chicks daily to help socialize them and build trust. Brought to You by thebackyardchickenfarmer.com ? Feeding baby chicks isn’t simply scattering some feed into their brooder. They need a balanced diet appropriate for their growth stage. STARTER FEED is the go-to during their early weeks, as it’s packed with crucial nutrients. Ensure feed is accessible and refresh it daily to prevent spoilage. Hydration is just as critical. Chicks should have constant access to clean, fresh water. Check water containers throughout the day to ensure they’re full and clean. Opt for shallow water dishes or add marbles or pebbles to deeper ones to prevent drowning. Observing your chicks can clue you into their health status. Active and curious behavior typically signals that they’re healthy. Be on the lookout for concerning signs like lethargy, unsteady walking, or lack of appetite. If such symptoms appear, consulting a veterinarian is your safest bet. Accurate environmental control within the brooder can’t be overstated. You need to maintain the correct temperature gradient; as chicks grow, they’ll require less heat. Use a thermometer for precise measurement, and notice if chicks huddle (too cold) or pant (too hot). Adjust accordingly. Finally, proper humidity and good ventilation prevent respiratory issues and regulate temperatures. However, avoid drafts. Cleanliness also deserves
Chicken Coop Maintenance Tips
Disclosure: This post may contain affiliate links. If you purchase through these links, I may earn a small commission at no extra cost to you. As with our homes, chicken coop upkeep is year-round. Even in the middle of winter, cleaning and maintaining the coop should be topmost on our minds. Chickens don’t take a break in the winter, nor can we. Like with our homes, there is always ongoing cleaning and maintenance, no matter the time of year. Keeping a chicken coop in top shape goes beyond basic animal husbandry; it ensures your chickens are healthy and happy and lead productive lives. A clean and well-maintained coop is necessary for your chickens’ well-being. Keeping your coop clean reduces the risk of disease while enhancing the consistency of egg laying and promoting better egg quality. When you think of chicken coop maintenance, think of your home. Consider what would happen if it wasn’t regularly cleaned. Not only would the clutter be an issue, but the dirt and potential for pests would not be a happy thought. The same principles apply to a chicken coop. Chickens are naturally clean animals, and a dirty environment stresses them out. This stress can directly impact their egg-laying capacity and compromise their immune system, causing sickness and disease to spread through your flock. Make sure to read What Every Chicken Coop Needs. Besides the maintenance, there are weekly cleaning rituals you need to adopt. Weekly cleaning keeps your chickens pest-free and comfortable and transforms maintenance chores into a routine you’ll hardly think twice about. It’s More than Chicken Coop Cleanliness Chicken coop maintenance is more than cleanliness; it also involves ensuring your coop has a secure physical structure. Consider your coop as the fortress protecting your chickens against possible predator attacks and nurturing habitat for your feathery friends. Maintaining your chicken coop involves routine vulnerability checks and looking for places your chickens could escape or predators could get inside. Ensuring the strength of your chicken coop helps give your chickens their desired consistency. For your chickens to thrive, they need predictability. A well-maintained coop provides your flock with a stress-free and stable environment. This stability contributes positively to their daily routines and overall happiness. My routine includes weekly maintenance checks and necessary repairs, ensuring proper insulation and ventilation, and monitoring for any signs of damage or wear and tear. These inspections can be short and quick, or there may be times when they are lengthier because you need to search for and find security issues. These steps support your chickens’ health and maintain the coop’s longevity, saving you time and money in the long run. Weekly Cleaning Rituals In addition to daily maintenance tasks, a weekly cleaning ritual is paramount for maintaining a healthy and hygienic environment for your backyard chickens. A thorough weekly cleaning routine ensures your flock’s well-being and helps prevent the spread of diseases and pests. Start by removing all bedding material from the coop and nesting boxes and replacing it with fresh bedding to keep the coop dry and odor-free. Inspect the coop for any signs of wear and tear, such as loose wires or damaged wood, and make necessary repairs to ensure its structural integrity. Next, thoroughly clean all surfaces inside the coop using a mild detergent or poultry-safe disinfectant. Pay special attention to areas where droppings accumulate, such as perches and roosting bars. Scrubbing these areas will help eliminate bacteria and reduce the risk of infection. Don’t forget to regularly clean and refill waterers and feeders to prevent contamination and ensure your chickens have access to clean water and fresh feed. Consider using automatic waterers and feeders to streamline the process and minimize the risk of contamination. While you clean the coop, inspect your chickens for signs of illness or injury. Check their eyes, nostrils, and feathers for abnormalities, and observe their behavior for signs of distress. Early detection of health issues is crucial for prompt intervention and treatment. Chicken Coop Maintenance Checklist ? Chicken Coop Maintenance Checklist ?️ Check and refill waterers and feeders daily to ensure your chickens can access clean water and fresh feed. Collect eggs daily to prevent them from getting dirty or damaged. Monitor your chickens for signs of illness or injury, such as lethargy or abnormal behavior. Inspect the coop and surrounding area for signs of predators or potential hazards, such as loose wires or holes in the fencing. Provide enrichment activities, such as dust baths or fresh greens, to keep your chickens mentally stimulated and happy. Keep the coop and nesting boxes tidy by removing debris or waste daily. Maintain proper ventilation in the coop by opening windows or vents to prevent moisture buildup and respiratory issues. By incorporating these additional daily maintenance tasks into your routine, you can ensure the health and well-being of your backyard chickens and promote a clean and comfortable living environment for them. Brought to You by thebackyardchickenfarmer.com ? Final Thoughts Maintaining a clean and well-maintained chicken coop is essential for ensuring your flock’s health, happiness, and productivity. Implementing regular cleaning rituals and conducting routine maintenance checks can create a safe and comfortable environment for your chickens to thrive. Keeping your chicken coop clean helps reduce the risk of disease and pests and contributes to your chickens’ overall well-being. Maintaining the coop’s physical structure also helps ensure its longevity and provides your chickens with a stable, stress-free environment. So, sit down and map out a weekly cleaning routine to prioritize the maintenance of your chicken coop. Your flock will thank you by supplying you with healthy eggs and cheerful clucks, and you’ll have the satisfaction of knowing you’re providing your backyard chickens with the best possible care.