Disclosure: This post may contain affiliate links. If you purchase through these links, I may earn a small commission at no extra cost to you.
Chicken manure is one of the best things your flock can produce for your garden. There’s a reason it’s called garden gold.
It is rich in nutrients, especially nitrogen, and can make excellent compost when handled properly. The problem is that raw chicken manure is too strong to use straight from the coop. It can burn plants, add too much salt, and raise food safety concerns if used without proper composting and curing. That is why composting matters.
Instead of treating coop cleanup like a waste problem, you can turn manure and used bedding into a dark, crumbly soil amendment that improves soil structure, water-holding capacity, and nutrient availability. University extension sources note that well-managed composting helps reduce odor and pathogen concerns compared with simply piling manure and litter in one spot.
If you are still working on your coop routine, read our How to Clean a Chicken Coop guide first.
Why You Should Compost Chicken Manure Instead of Using It Fresh
Fresh chicken manure is powerful, but it is not garden-ready.
Chicken manure has a very low carbon-to-nitrogen ratio compared with materials like straw, leaves, or wood shavings. Kentucky and Nebraska extension sources note that successful composting usually works best at a carbon-to-nitrogen (C/N) ratio of about 30:1, while chicken manure is much higher in nitrogen. That is why bedding matters so much in the compost pile.
In addition to adding bedding from the coop, add grass clippings and leaves from your yardwork. If you know someone with a lawn service, you may be able to take some of the grass clippings and leaves off their hands. They may be all too happy to have you take them rather than having to dispose of them themselves.
Raw manure can also be too salty and too strong for seedlings and transplants. The University of Idaho and Oregon both warn that manure-based composts can cause plant problems if they are not fully composted and cured before use.
While some gardeners say you can let your compost pile cook for 2-3 months, a better timeframe is 6 months to 1 year. Once you have your first year as a backyard chicken keeper under your belt, it is easy to set up composting with your twice-yearly deep cleaning.
Composting helps the material heat up, break down, and stabilize over time. Properly managed piles need the right balance of nitrogen, carbon, oxygen, moisture, and mass.
All you need is a weekly stir, with the ideal time to turn being when the internal compost pile temperature falls from its peak of 130–160°F down to 130°F. When this happens, the bacteria need more oxygen to keep breaking down the compost.
It’s not complicated. You need a weekly compost maintenance schedule.
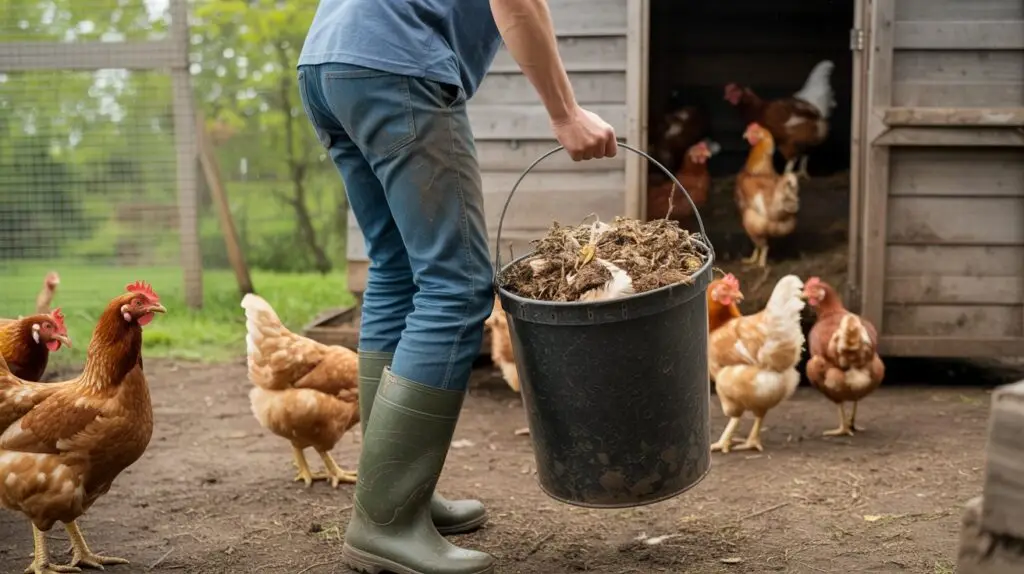
What You Can Compost from the Coop
Most backyard flock owners can compost all of the normal coop cleanup material, including:
- chicken manure
- used pine shavings
- straw bedding
- feathers
- small amounts of spilled feed
- dry leaves mixed in during cleanup
Those materials are actually a good starting point because manure supplies nitrogen and bedding supplies carbon. The University of Idaho notes that poultry litter, with roughly 25 percent manure and 75 percent bedding, is a very good starting material for high-quality compost for garden use.
What you should avoid adding:
- large amounts of wet, moldy feed
- trash, plastic, or treated wood shavings
- glossy paper
- pet waste
- large amounts of greasy kitchen scraps
Those do not help the process and can create odor, pest, or contamination problems.
What You Need Before You Start
You do not need expensive equipment, but a few things make composting much easier.
| 🧰 Item | Why You Need It |
|---|---|
| Compost bin or pile area | Keeps material contained and easier to manage |
| Shovel or pitchfork | For mixing and turning the pile |
| Compost thermometer | Helps you know if the pile is heating properly |
| Carbon material like dry leaves, grass clippings, or straw | Balances wet, nitrogen-rich manure |
| Water source | Adjusts moisture if the pile gets too dry |
| Tarp or cover | Keeps heavy rain from soaking the pile |
A compost thermometer is especially helpful because extension sources recommend monitoring heat rather than guessing. Kentucky Extension specifically recommends having one for backyard poultry litter composting.
Where to Put Your Compost Pile
Pick a spot that is easy to reach from the coop but not right up against your house.
A good compost site should be:
- on well-drained ground
- easy to access with a wheelbarrow or bucket
- sheltered from constant heavy rain
- not in a low spot where water stands
- convenient enough that you will actually use it
Kentucky Extension notes that bins do well in a shaded area, so the pile does not dry out too quickly. If your climate is very wet, a roof, tarp, or other cover helps keep the pile from turning soggy.
For a small backyard flock, a simple bin system works well. One bin can hold the active pile, while a second bin or a separate area is used to cure the finished compost. A two-bin system fits in perfectly with your bi-annual deep cleaning.
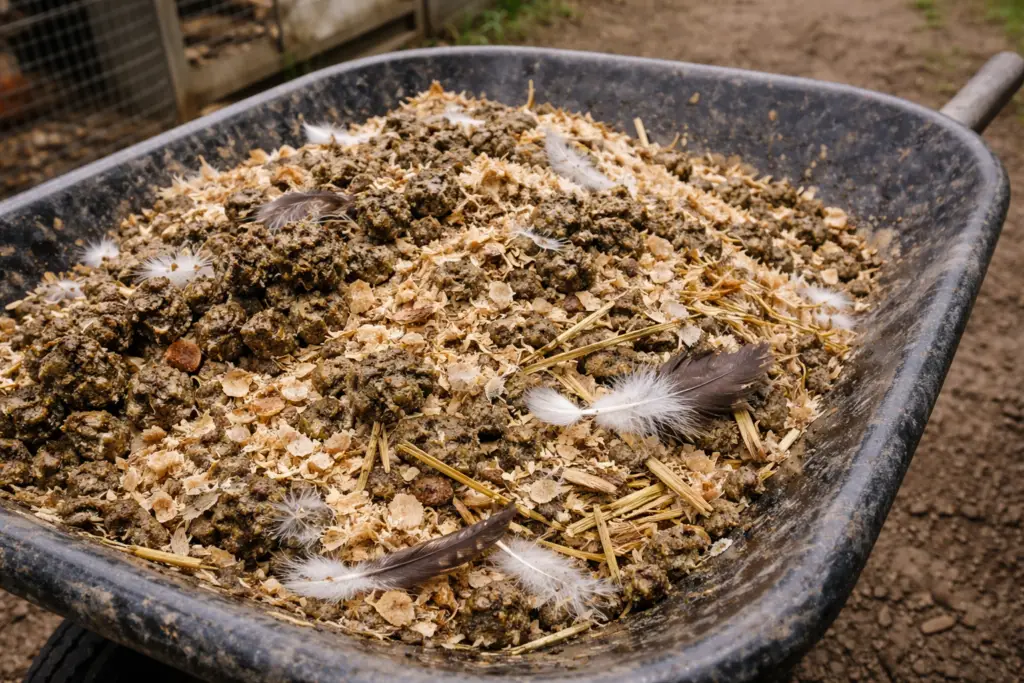
The Best Mix for Composting Chicken Manure
This is where most beginners either succeed or struggle.
Chicken manure is rich in nitrogen. Pine shavings, straw, dry leaves, grass clippings, and shredded cardboard are carbon-rich. Good composting needs both. USDA organic standards specify an initial carbon-to-nitrogen ratio of 25:1 to 40:1 for compost, and commonly recommend 25:1 to 30:1 as the sweet spot for fast composting.
In plain English, that means:
- If your pile is mostly manure, it will likely smell strong and go slimy
- If your pile is mostly shavings or straw, it may sit there and barely heat up
- If your coop waste already contains a moderate amount of bedding, you may be closer to the right mix than you think
University of Idaho says litter with around 25 percent manure and 75 percent bedding is a very good starting point. If your coop cleanup looks much heavier on manure than that, add extra dry leaves, grass clippings, pine shavings, or straw. If it looks mostly like dry bedding with very little manure, the pile may need more nitrogen-rich material to heat up well. This is where kitchen scraps can be a helpful ingredient. However, avoid meat or greasy scraps.
Step-by-Step: How to Compost Chicken Manure
Now that you’ve picked the perfect spot for your compost pile and you’ve gathered all your supplies, it’s time to start cooking.
Step 1: Build the pile with enough volume
Tiny piles do not heat well. A pile may fail to heat because it is too small. Many home composting guides also recommend a roughly 3-foot-by-3-foot-by-3-foot pile as a workable minimum for good heat retention.
For a backyard chicken keeper, a practical goal is to build a single decent-sized pile rather than multiple small heaps. Or, go with two piles, one you use from and the other that is fermenting for the next gardening season.
Step 2: Layer or mix your materials
Add your coop cleanup, then mix in extra carbon material if needed.
Good carbon materials include dry leaves, grass clippings, straw, pine shavings, and shredded cardboard in small amounts.
Kentucky Extension suggests a pile composed of about 70 to 75 percent carbon material and 25 to 30 percent nitrogen-rich material for successful backyard poultry litter composting.
Step 3: Moisten the pile
Your pile should feel like a wrung-out sponge or a damp sponge. Multiple extension and EPA sources use this exact moisture target because it is wet enough for microbes but not so wet that you squeeze oxygen out of the pile.
If you squeeze a handful and water drips out, it is too wet. If it feels dusty and dry, add water as you build or turn.
Step 4: Cover the pile if needed
If you get a lot of rain, cover the pile with a secured tarp or place it under a simple roof. Cover the bin and leave it undisturbed for at least two weeks after building. However, you don’t want your compost pile to dry out too much, so check it regularly.
Step 5: Monitor temperature
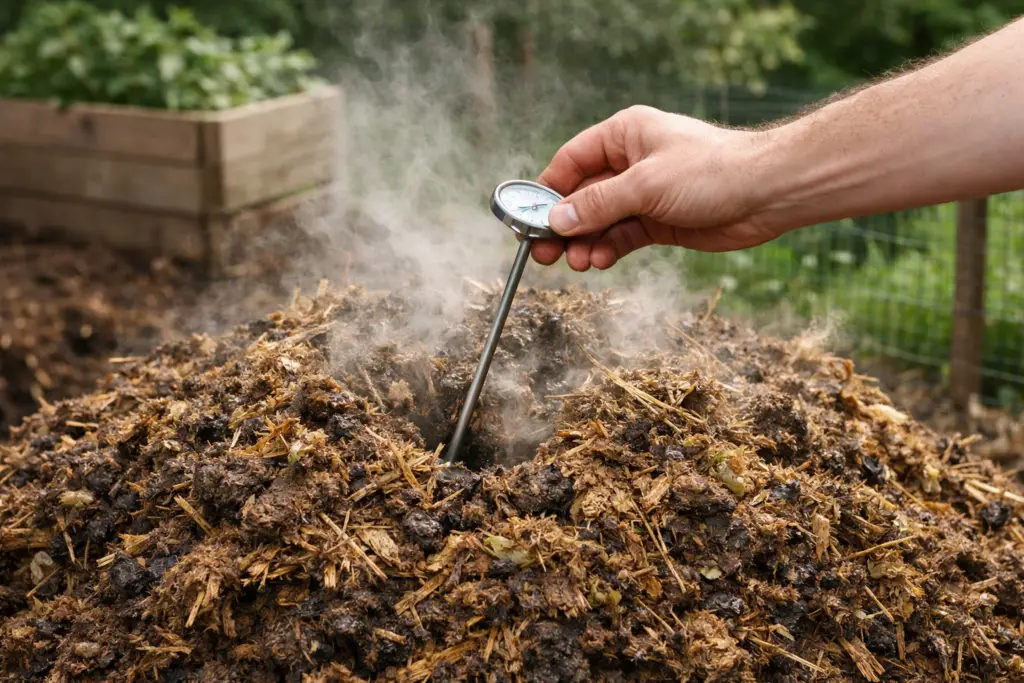
A healthy pile should heat up noticeably. It should reach about 130° to 150° Fahrenheit during composting. A preferred rapid-composting range is around 130° to 140° Fahrenheit.
If you want a higher sanitation standard, USDA organic rules require these managed compost benchmarks:
- 131° to 170° Fahrenheit for 3 days in an in-vessel or static aerated pile
- 131° to 170° Fahrenheit for 15 days, with at least 5 turnings, for a window system
Most backyard keepers are not composting for certification, but those numbers are still useful targets for understanding what proper heat and turning look like.
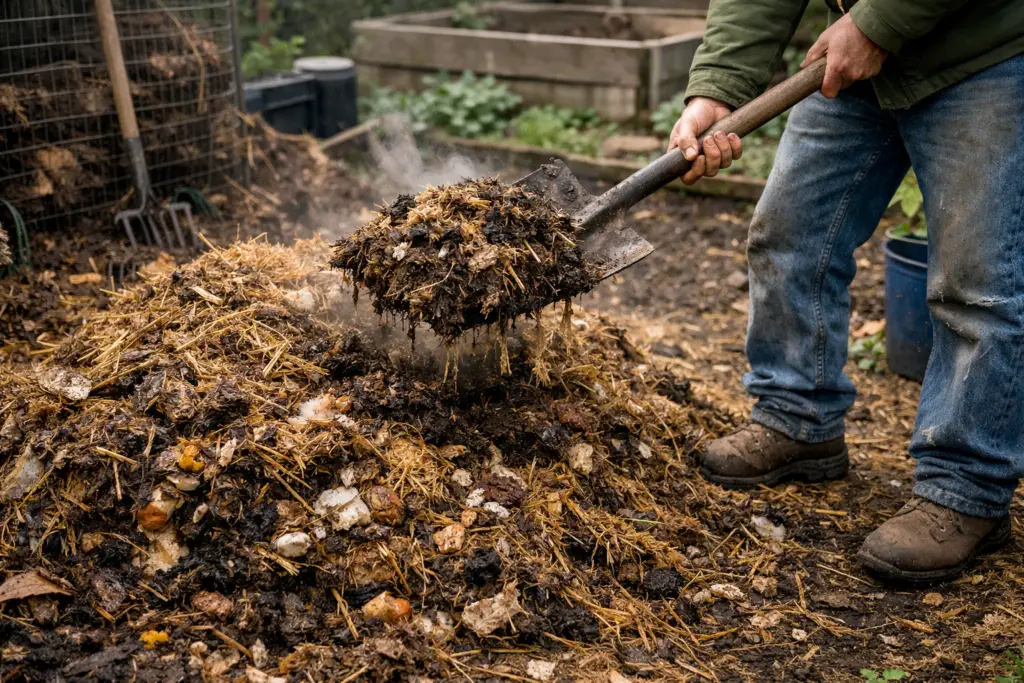
Step 6: Turn the pile
Turning adds oxygen and helps bring outside material into the hotter center. If the pile cools after an initial heat-up, turn it. If it smells sour or rotten, turn it and add more dry carbon. An overly wet pile loses oxygen, allowing smelly anaerobic microbes to take over. The fix is to turn the pile and add dry carbon, like leaves, grass clippings, or pine shavings.
A practical backyard approach is to turn the pile every week or two during the active stage, especially if you are trying to speed the process.
Step 7: Let it finish and cure
To ensure you have the best garden gold, don’t rush the curing step.
A well-managed manure compost pile often takes about 4 to 8 months, followed by a 2 to 4-monthcuring period for higher-quality compost. Finished compost benefits from curing and should be dark, crumbly, and have an earthy, non-offensive odor. Curing matters because even after the hot phase is done, the material is still stabilizing.
Curing matters because even after the hot phase is done, the material is still stabilizing. Wait until it is dark, crumbly, earthy-smelling, and finished with its curing period before using it around vegetables or tender plants
Finished compost is generally darker, crumblier, and more soil-like, and should not smell rotten or strongly of ammonia. Iowa State, Utah State, and other extension sources all describe those as signs of mature compost.
How Long Does It Take?
A simple answer is that chicken manure compost usually takes months, not weeks.
A well-managed pile may finish active composting in a few months, but the total time to a stable, cured product, safest to use on your plants, is often closer to 4 to 8 months. Plus, curing time depends on pile size, weather, mix, and how often you turn it.
If your pile is cold, very dry, too small, or mostly wood shavings, it can take much longer to dry out.
Common Problems and How to Fix Them

| ⚠️ Problem | Likely Cause | What to Do |
|---|---|---|
| Pile smells bad | Too wet or too much nitrogen | Turn it and add dry leaves, straw, or pine shavings |
| Pile will not heat | Too dry, too small, or not enough nitrogen | Moisten it, build a bigger pile, or add more manure-rich material |
| Pile is slimy | Poor airflow and excess moisture | Turn it and mix in coarse carbon material |
| Pile breaks down very slowly | Too much bedding or large dry materials | Add nitrogen-rich material and turn more often |
Those fixes line up closely with UGA’s backyard poultry litter troubleshooting guidance and general extension composting recommendations.
How to Use Finished Chicken Manure Compost
Once the compost is finished and cured, it becomes very useful.
Composted poultry litter can be worked into garden beds to improve soil structure, organic matter, moisture retention, and nutrient availability. One application incorporated into the top 6 to 10 inches of soil can provide nutrients across the growing season while also improving soil health.
A few practical rules matter here:
- Use finished compost, not half-finished material
- Start modestly if you are using it around vegetables or seedlings
- Be aware that manure-based composts can be higher in soluble salts than some other composts, so avoid going overboard, especially around sensitive plants and seeds
For most backyard gardeners, composted chicken manure is best thought of as a strong soil amendment rather than something to pile heavily against tender plants.
Frequently Asked Questions
Can I compost chicken manure with pine shavings?
Yes. In fact, that is common and often useful because manure provides nitrogen, and pine shavings provide carbon. If the pile seems too woody and slow, add more nitrogen-rich material.
How hot should a chicken manure compost pile get?
A healthy pile commonly reaches around 130° to 150° Fahrenheit. USDA organic compost rules use 131° to 170° Fahrenheit as the managed temperature range for pathogen-reduction standards.
How do I know the compost is finished?
Finished compost should be dark, crumbly, earthy-smelling, and no longer resemble the original bedding and manure. A curing period after the hot phase improves stability.
Can I put raw chicken manure straight in the garden?
It is a poor choice for most home gardeners because it can burn plants, add excess salts, and create safety concerns. Composting first is the better route.
Final Thoughts
Chicken manure is not just something to haul away. If handled properly, it becomes one of the most useful products your flock gives you.
The most important factors are getting the mix right, keeping the moisture at that damp-sponge level, monitoring heat, and giving the pile enough time to finish and cure. When you do that, you end up with a better garden and a cleaner chicken-keeping routine.
Sources used for best practices and composting guidelines:
References
- University of Kentucky Cooperative Extension. Composting Poultry Litter.
https://publications.mgcafe.uky.edu/files/ASC242.pdf - University of Idaho Extension. Using Poultry Manure as Fertilizer.
https://objects.lib.uidaho.edu/uiext/uiext31507.pdf - USDA Agricultural Marketing Service. National Organic Program Compost Standards.
https://www.ams.usda.gov/grades-standards/soil-building-manures-composts - Iowa State University Extension. Using Manure in the Home Garden.
https://yardandgarden.extension.iastate.edu/how-to/using-manure-home-garden - University of Georgia Extension. Poultry Litter Composting for Backyard Flocks.
https://fieldreport.caes.uga.edu/publications/C1097/poultry-litter-composting-for-backyard-flocks/ - University of Illinois Extension. Home Composting Guide.
https://extension.illinois.edu/sites/default/files/home_composting.pdf - Oregon State University Extension. How to Use Compost in Gardens and Landscapes.
https://extension.oregonstate.edu/catalog/em-9308-how-use-compost-gardens-landscapes - Utah State University Extension. Backyard Composting.
https://extension.usu.edu/yardandgarden/research/backyard-composting-in-utah