
Raising Meat Chickens in Your Backyard

If you have been considering raising backyard chickens for meat, but just need a little push form logic before diving in, maybe I can help. The popularity of backyard chicken farming is growing each year with few signs of slowing down anytime soon. The idea of sustainability, self-reliance, and healthy food sources has people embracing this hobby. Many like the idea of producing their own food giving the security of knowing they can take care of themselves and their loved ones. We raise chickens for both meat and eggs. Besides buying chickens specifically for meat, we use the laying hens once their egg production stops. I urge everyone to raise laying hens, however I also suggest careful consideration before raising meat chickens. The most important question to ask yourself is; “Can I do this when the time comes?” Recommended Reading If you are thinking about raising chickens for meat, this is a must read. After 20+ years of raising chickens, there are still tears at the killing station. My husband and I have great affection for chickens, so when we slaughter for meat, it is because of that affection. We know that our chickens lived well and died quickly and humanely. In keeping with my husband’s Cherokee teachings, we give thanks to them for sustaining us. If we didn’t feel so deeply about giving all life respect, we would buy our chicken from the store. Never overlook all aspects of raising chickens. Becoming emotionally attached to your chickens is a possibility, making butchering difficult. Do some introspective thinking about whether you or your family will have difficulties with this. You always have the choice of taking your birds to a butcher, but this will add to the cost of raising your chickens. Best Breeds – My Experiences So what breed is best for meat chickens? I’ve heard this question many times. Whether you want better sustainability or just a bird to roam with your hens without adding extra chores, picking the right breed is sometimes difficult. Dual-Purpose Dual-purpose chickens are not meat or egg chickens; they are both. Many of your dual-purpose chickens are heritage breeds, consisting of both rare and not so rare birds. Usually, the layers don’t lay massive amounts of eggs but lay steadily throughout the year. The males dress out with a weight of about 5 pounds after 20 weeks; the hens are slightly smaller at 3 pounds. We like to process our males at 16 weeks because with a smaller bird, the meat is leaner. I like the way the smaller birds cook more uniformly. Dual-purpose chickens are a perfect starter bird and I recommend trying them for meat chickens before moving to faster growing chickens like the Cornish X or Cornish Rock. For those living outside the United States, here is a listing of dual-purpose breeds in your country. Advantages • Most dual-purpose chickens are good for any suburban farm space and are aggressive foragers, making them excellent free rangers. • If you process before 24 weeks, their meat is flavorful and tender: if kept longer, the meat becomes tough. We normally keep Rhode Island Reds and Black Star hens for laying. When they get too old for laying, we butcher them for soup chicken and at 4 pounds dressed, they make a good amount of meat. Disadvantages • If you plan to sell your dressed birds, their smaller carcass weights might make them harder to market. • They have less overall meat compared to standard meat breeds and the feed to meat ratio is substantially higher. • It takes longer to process the chickens for meat which may be too long for people with busy lifestyles or short growing seasons. • With their harder keel bone, dual-purpose chickens are difficult to process while older birds have hair which needs singing to remove. Cornish X Rock or Broilers Cornish X Rocks are the favored commercial farm chickens because of their feed to meat ratio: 1.9 pounds of feed to meat ratio makes a commercial dream. For a backyard chicken farmer, these chickens have a 2.5 pound ratio because of the lack of facilities and equipment.These birds are genetically superior through selective breeding with the sole purpose of processing in 6-12 weeks. If you want birds with short growing periods, then this breed is what you need. White feathers, light skin, and a short squatty stance are good characteristics of a meat bird. Advantages • Chick price is cheap, sometimes 60¢ during spring sales. • Fast growth rate with an average weight of 4 pounds with both males and females making excellent meat birds. • Excellent feed to meat ratio of 1.9-1. • Body contains soft bones with easy to access cavities. • Easy to pasture in tractors and will forage for up to 25% of their food. • If raised correctly by the backyard chicken farmer, whether on pasture or in confinement, Cornish X Rocks don’t face many of the health problems commercial birds do, like, leg problems and heart failure. Disadvantages • Not good for sustainability. Must buy new chicks each year because letting them mature to breeding age is costly; the feed cost is more than the chicken’s worth. Dual-purpose breeds are better for sustainability. • Care is time-consuming because of leg and joint problems from overfeeding and not enough exercise, making them unwilling to forage. This also contributes to heart problems and early death. • Birds are not willing free rangers and must have food withheld to force them to forage. They don’t venture far from the feeders. • Must keep Cornish Xs separate from other chickens because of their different needs of feed and pasture. This is time-consuming and may not fit into some people’s lifestyle. • Frankly, these birds are ugly and go through an awkward growing stage. Their plain white feathers is an unappealing to poultry lovers accustom to bright, colorful birds. Freedom Rangers Freedom Ranger chickens are slower growing than the Cornish X and prettier to look at
New Chicken Coop and Pen on the “Cheep” – Step 1
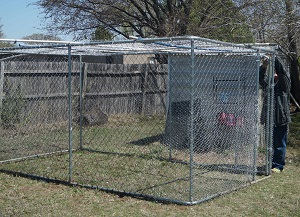
We decided to build a new coop and pen for our flock. The old coop is about 10 years old and in need of repair. Plus, we want the coop closer to the house. Sitting at the back of our two acres, the old coop is a cold and wet walk during the winter. Now, it’s time to build new and tear down the old. We don’t want to spend a lot for the new coop so we set ourselves a budget of $200 or less. A lofty goal but doable for us. We are masters at repurposing and finding items cheap or free. So, we’re off and to a good start, I might add. As we progress through our journey of building on the “cheep”, I will bring you with us, updating this post as we move forward with pictures and a supply cost list. So return often to see if we do it. Let’s Begin Sunday, April 14, 2013 We’ve accomplished a lot today. I’m amazed at how quickly the pen is coming together. We have a few small things left to do, but for the most part, the pen is complete. I even have dinner in the oven. How’s that for having a productive day? You know I told you we were cheap, repurposing whenever possible; well how about spending $51.37? The only thing we bought for the pen was a 150’ roll of poultry wire at Lowe’s. In the first step of our “cheap” chicken pen and coop, we are repurposing an outdoor wire dog kennel: cost…$0. We rescued this pen off a neighbor’s trailer as he was heading to the dump. He no longer has dogs so he no longer needs the dog kennel. We saved him the energy of removing the kennel from the trailer and he saved us over $200: a win-win situation. The dog kennel measures 7 feet across, 13 feet long and 6 feet high; a good size for our six hens. We plan to expand it in the near future but is adequate for the girls right now. If you don’t want to drive around town looking for dog kennels being thrown away, you can buy a new one. Amazon offers Lucky Dog 4-by-10-by-5 Foot CL41098 Easy Ship Chain-Link Box Kennel for $271.00. This is a great buy and good investment. These kennels are sturdy, easy to assemble, and will last a long time; probably 10-15 years or more. They may not work well for dogs but are great for chickens. Around the outside and over the top, we connected chicken wire. Before we move the girls into their new home, we will place compressed pegboard material around the bottom to keep predators from digging underneath the kennel (we have an unlimited supply of this from hubby’s work). I also recommend placing chicken wire over the top of your pen, especially if you live on city outskirts. Certain birds like hawks and crows are predators and if the top is not covered, they will take your chickens. Even if you live in the city, securing the top of your pen is a good idea. [callout title=Recommended Reading] Storey’s Guide to Raising Chickens: 3rd Edition (Storey’s Guide to Raising Series)[/callout] To support the top wire covering, we used small pvc piping we found dumped along the back road to our house. We also found a roll of galvanized, 18gauge wire which we used to secure the poultry wire to the kennel. Any type of wire will work; baling wire, metal close hangers, fencing wire, etc. There’s no need to pay for wire when you can find it for free, just about anywhere. [callout title=Chicken Pen Supplies and Prices]Outdoor dog kennel – Free Poultry wire – $51.37 PVC – Free Miscellaneous wire for connecting – Free Compressed pegboard material – Free Total Cost: $51.37 [/callout] Our next step is building the coop. We will place the coop on the back of the pen with the coop front inside the pen. It will be built on stilts so our chickens can set underneath out of the sun, with a chicken run going from the coop to the yard. On the back we plan to place doors to open so we can gather eggs and change out the bedding. Come back to see us as we start the chicken coop in the next week. Hopefully our coop will be a “cheap” project as well. [callout title=Follow Us With Step 2] New Chicken Coop and Pen on the “Cheep” – Step 2 [/callout]
Functional Kitchen for an Urban Homestead
Urban homesteading is sparked by a yearning to return to a simpler and more self-sufficient lifestyle. This is not only deeply satisfying to the soul, but it makes sound financial sense. While almost any kitchen can support a microwave and any microwave can handle frozen dinners, drying and preserving foods at home requires reliable equipment that can handle the increased workload of preserving foods in bulk. Whether you are growing and preserving your own produce or looking to support local growers while avoiding the chemicals and additives of commercially preserved foods, your first step is to make sure your kitchen is up to the task. This doesn`t mean you need to spend a fortune on commercial-grade equipment, though if you can do so it will pay for itself in the long run. Still, a tight budget needn`t stand in your way. With a little planning and a few smart purchases, you can have a functional urban homestead kitchen at a price any pioneer would love. The most important piece of equipment you will need is an excellent cooker. Get the largest one that you can afford and that will fit in your space. The more burners you have, the more you can have going on at once, which is crucial when preserving end of season produce. A large oven allows you to dry several trays of fruits or vegetables at one time and also ensures that you`ll have plenty of room for home cooked meals such as roast chicken. If it is possible to vent your cooker to the outdoors, invest in a large range hood. This helps to keep the kitchen from overheating when you`re sterilizing jars, boiling preserves, cooking down homemade stock or making your own beer. Look for hand-powered appliances that can do the work of electric ones to save on power bills. A food mill separates seeds and pulp from stewed fruits and vegetables as efficiently as an extractor does but uses a hand crank instead of an electrical cord. Use a mortar and pestle to grind the herbs you`ve dried before storing them in small glass jars. Counter space is usually at a premium in urban homes, so look for ways to increase it. Store pots and pans on hanging racks to save cupboard space for small appliances to get them off your counters. Store large mixing bowls on top of cabinets so they can be as decorative as they are functional. Choose sustainable, easy to clean surfaces for your cabinets, counters and floors. Cork is highly prized for floors because of its affordability and sustainability, but it can be difficult to keep clean if not properly sealed. No matter how self-sufficient and how far off the grid you might want to be, don`t skimp on professional services when it comes to safety. All electric and gas appliances need to be installed and hooked up by professionals to ensure that they will function safely.
Hearty Chicken Noodle Soup

Everybody knows that chicken soup is good for the soul, but studies show that it`s also good for the body. When you catch a cold, your body sends out white blood cells to fight it. These cells, called neutrophils, don`t always stay where they`re needed and their migration causes stuffy noses and coughs. Scientists at the University of Nebraska Medical Center have found that something in chicken soup keeps the neutrophils from wandering and lessening their effects on your body. Researchers at Mount Sinai in Miami also found that chicken soup not only helps clear stuffy noses, but it also improves the effectiveness of your cilia, which are your tiny inner nose hairs, in filtering out anything contagious that you might breathe in. Neither study isolated what exactly makes chicken soup so effective. Experts agree that it`s probably something in the combination of chicken and vegetables, so don`t skimp on the fresh produce when making your soup. Hearty Chicken Noodle Soup Equipment Needed Roasting pan with rack Pot or Dutch oven Ingredients Olive oil Unsalted butter, softened 1 chicken, raw White wine, dry Cracked pepper Kosher salt Sage Rosemary Thyme 1 parsnip 2 onions 3 to 6 cloves garlic 4 to 6 stalks celery Strainer 2 carrots Corn Peas Egg noodles, cooked Directions Preheat your oven to 350° F. Coat a roasting pan and rack with olive oil and place your fresh chicken on the rack, breast up. Massage the softened butter into the chicken`s skin. Pour 1 cup or so of dry white wine over the chicken. Add enough water to the roasting pan to fill it to about 1/4 inch. Season the chicken with cracked pepper, kosher salt, rosemary, sage and thyme. Roast the chicken for 60 minutes or until a meat thermometer reads 65° F. Boiling a chicken leaches flavor from the meat. Roasting the chicken and then boiling the carcass takes longer but gives you fresh broth without sacrificing the meat`s flavor. Take the chicken out of the oven and off the rack and set it on a plate to cool. Leave the juices in the roasting pan. When the chicken is near room temperature, pick it clean, separating the meat into one bowl and the skin and bones into another. Coat the bottom of a large pot or Dutch oven with olive oil and turn the heat to medium. Add the chicken skin and bones. Cover the bones with at least 6 to 8 cups of water and another cup or so of white wine. Add the drippings from the roasting pan. Skim the fat off the top first, if you prefer. Peel and roughly chop a parsnip and put it in the pot. Peel and quarter 1 onion and separate the sections into the pot. Peel and slice 2 or 3 cloves of garlic, depending on how strong a garlic flavor you prefer. Wash 2 or 3 stalks of celery, but don`t remove the leaves. Cut the stalks into quarters, crosswise. Toss them into the pot. Bring the pot to a boil. Lower it to a simmer and let it cook, uncovered, for at least 1 hour. Strain the broth into another pot and set it back on the stove at a simmer to cook down for another 30 minutes or so. Discard the skin, bones and other solids. Taste the broth and correct the seasoning, remembering that the flavors will get more intense as it cooks down. If the flavors get too intense, add a little water. Rinse the first pot and coat the bottom with olive oil. Peel and chop 1 onion, 2 to 3 cloves of garlic, 2 to 3 stalks of celery and 2 small carrots. Season them with cracked pepper and kosher salt and sauté over medium heat until they soften. Taste the broth. If it`s cooked down enough, add it to the vegetables. If not, turn the vegetables off until the broth is done. Add the broth to the vegetables. Shred or chop the chicken meat and add that. Stir in corn and peas to taste. Petit pois peas are excellent in this soup. Correct the seasoning and let the soup simmer for about 20 minutes to let the flavors blend. Serve over hot, wide egg noodles. Keep the noodles separate when storing leftovers or they tend to absorb all of the broth. The fresher the ingredients, the healthier the soup. The chicken soup lovers at The Backyard Chicken Farmer recommend a home water system like those offered at Angel Springs to ensure that you start with the purest water possible.
Best Kitchen Equipment for Home Meat Processing and Preserving
Most people think of jellies, jams and pickles when they consider preserving at home, but it is not any more complicated to process and preserve your own meats. The main difference is the need for appliances that can handle heavy grinding and tasks like stuffing sausage casings that are far too difficult and time consuming for modern urban homesteaders to manage by hand. The first thing you will need is a safe supply of fresh meats. If you are raising animals for slaughter, take an extensive training course in proper butchering techniques. This is for safety as well as for efficient use of the meats, because improper butchering can lead to contamination. Invest in a good set of meat knives. Which brand is best is largely a matter of personal preference, but any knife you use should have a blade that is securely attached to the handle and which can be sharpened when needed. The smaller the animal, the smaller and thinner the knife should be. A good meat grinder is necessary if you are going to grind your own ground beef and especially if you intend to make homemade sausages. Look for a grinder that has a workhorse of a motor, because that is the most crucial part. If you are new to processing and preserving meats at home, consider investing in a good standing mixer, because they generally have meat-grinding attachments available. Another feature to look for is a reversible feeder to take care of tougher meats like game animals. Many meat grinders come with a funnel for stuffing sausage casings, but these are not efficient enough to stuff casings without letting the meat become too warm. Look for a piston-driven stuffing attachment to power the ground meat into the casing fast enough to ensure that it retains a safely chilled temperature.A hamburger press is a good idea if you`re making a large quantity of burgers, because it produces burgers that are all the same size and weight. This is important because when you make burgers by hand, they can be of such different weights and thickness that they won`t cook at the same rate. That means a few overcooked burgers in every batch along with a few that may be dangerously under-cooked. If you are roasting and smoking your own meats, making cold cuts is an excellent and versatile way to use them. A meat slicer with a rotating blade and adjustable feed system allows you to slice meats, cheeses and vegetables to uniform thickness. This is not only important in processing meats, as it can help with canning vegetables, making pickle slices and (best of all) home made potato, sweet potato, turnip and beet chips. Once your meat has been processed, one of the safest and most convenient ways to preserve it is with a vacuum sealer. Place single servings of meat, sausage or poultry into small plastic bags and use the vacuum sealer to suction out all of the air. This protects the meat while allowing you to see what it is. Label the plastic bags with the date to ensure that all of your meats are enjoyed while they are still fresh. If you intend to process and preserve the majority of the meat your family will consume, it might be wise to check out an array of both personal and commercial-grade equipment. The urban homesteading enthusiasts at The Backyard Chicken Farmer recommend consulting with the friendly experts at CS Catering Equipment to get an idea of where to start in stocking your kitchen to home process meats safely, efficiently and deliciously
Urban Farming: A Growing Industry

With the concern about food safety, farmers markets popularity is increasing as people look for organic fruits and vegetables. From college campuses to city blocks, farmer’s markets are a staple of our culture. Large Cities Going Green In rural New York, farmers travel to Brooklyn farmers markets to sell their crops. With the demand for safer food, urban farming provides consumers with food from a trusted source while decreasing the amount of food affected by genetic enhancements. This growth of farmers markets leads to increases in urban farming. In addition to supplying healthy organic food, in some areas, urban farming utilizes unused city resources, like abandoned buildings and lots; spaces are converted to urban farms, like the greenhouse on an abandoned dock in New York City. In addition to reclaiming abandoned property, many urban farms are located on city rooftops. This helps keep buildings cooler and saves energy by lowering the cost of air conditioning. Many Benefits Environmental waste from transporting food by trucks leaves a carbon footprint on our environment. By offering food locally to farmers markets and grocery stores, urban framing saves money and lessens environmental waste. The demand for urban farming provides jobs and education, with many farming programs opening in major cities. Children and adults learn about the benefits of growing local while working on a farm; giving them the knowledge of what it takes to start their own urban farm. Even with the benefits of urban farming, there are concerns as well. Cities often contain more pollution than their outskirts which raises concerns the pollution will contaminate the city soil and its crops. While the crops help make the air cleaner, some cities are too polluted for harvesting healthy crops. The New Trend is Not So New Urban farming is becoming noticeably trendy in the United States; however it’s not a new concept. Beginning in Ancient Egypt, urban farming is centuries old. Using available resources, Egyptians used excess waste as the plot for seeds. Following the Egyptian’s lead, Grange Farm in Brooklyn, New York makes use of resources found in unusual areas. Grange Farm utilizes over two acres of rooftops, in Brooklyn and Queens, New York. Since opening in 2010, they’ve sold more than 40,000 vegetables to their. Their goal is to bring delicious vegetables to their community while building New York into a more sustainable place to live with positive effects to the environment. Grange Farm sells locally to restaurants as well as operating farm stands at farmers markets throughout the boroughs. They also sell privately to CSA members but do not sell beyond the boroughs of New York City. Their business however transcends the island of Manhattan as they consult on urban farm set ups throughout the United States. Grange also offers a non-profit program called City Growers. With learning on the farm and in the classroom, this program educates students about urban farming, health, and sustainability. The program’s goal is making future generations more environmentally conscious while learning ways to make a greener New York. Other Urban Farming Operations Zenger Farm, in Portland, Oregon, was established in 1913. Established in 1913, Zenger Farm in Portland, Oregon is a family tradition, passed from Ulrich Zenger to his son, Ulrich Zenger Jr. The farm has remained independently owned since it began. While continuing to produce crops since Zenger Jr.’s death, the farm is also a non-profit for educational out reach. Along with keeping crops sold independently, they educate children on sustainable living. The basis of the educational program at Zenger comes from the idea that healthy food comes from healthy soil even in the city. This educational program teaches about food, farming, and wetland conservation and how these things make for a healthy, thriving, city environment. Zenger Farm offers farm field trips where students can visit and learn about the farm and the importance in keeping a green community and a one-week summer camp where students actually work on the farm. Weekend workshops are also provided—in workshops adults are taught farm skills by working on the farm and learning about buying healthy organic food on a budget. Zenger takes pride in their community outreach and sharing the importance of their urban farm in improving the Portland community. B&T Farm, based in the Los Angeles neighborhood of Hacienda Heights, began in the backyard of Brett Wyatt. After raids at the Buddhist monastery he was studying at, he began working at a farm in Thailand. It was there he met his wife Tanya and decided to continue their passion for growing in the United States where they specialize in oyster mushrooms and sell to customers at farmers markets on the weekends. Oyster mushrooms require a rigorous process of boiling the seeds to ensure no other mold grows around the mushrooms. The Wyatts also grow crops native to Thailand as well as crops more prominent in the United States, such as spinach and broccoli. Detroit’s Hantz Farm boasts the largest Urban Farm in the United States. With Detroit’s economic downturn from the failing auto industry, thousands of houses stand empty. Once the properties were vacated, the land reverted back to the city. No revenue could be collected and these lots set vacant so many were sold. Hantz Corporation began buying the land from the government to build into urban farms and community gardens. In doing this, Hantz is creating jobs, offering healthy food choices, and revitalizing the land while helping the city of Detroit. In addition to their urban farms, Hantz is planting trees to help the environment and beautify the city. By helping the community through growth, Hantz is bringing the communities together while helping each other and getting involved in restoring the city. Urban farms help improve a city’s environment, economy, land, and community. Many major cities have community farms where anyone can start a plot and plant what they want to grow. If you’re interested in getting involved, check with your city. No matter how dense the population, there may be a plot
Bring on the Eggs
Warm Weather – Flowers – and Eggs I love this time of year; it’s not spring yet and winter lets us know, he’s still around. Yet, anticipating a green landscape freckled with colorful flowers, gives me something to look forward to in a few short weeks. The excitement of things to come makes me smile as the days slowly warm with lingering sunlight. It’s also the time of year we start planning. Right now, we’re planting seeds for our container gardens and planning out where everything will go. It’s also the time of year my hens start producing more eggs. While we gather eggs year around, except for in extremely hot or cold weather, spring and fall are our biggest egg production seasons. With my excitement for spring comes the duty of a responsible backyard chicken farmer. As well as the well-being of our flock, knowing about the eggs they produce is just as important. The Laying House – The Coop and Nest Because of the direct relationship to the condition of your eggs, I must mention flock management. While feeding your birds a balanced ration is important, coop and nest management is also important. • Chickens like to hide their eggs and pick some of the strangest places to nest. Because of this, I recommend keeping your flock in a fenced area. By letting your hens nest wherever they choose, there’s a higher risk of broken eggs and knowing how old the eggs are is difficult. • Clean, clean, clean, and more clean. Keeping the nest area clean and dry makes for better eggs. Muddy runs and damp, dirty nesting material results in dirty and stained eggs. I recommend cleaning the laying area once a week however, a minimum of two weeks is okay, making sure you remove all wet litter and the run has good drainage. • For a small flock of 15 hens or less, you need a minimum of four nesting boxes while larger flocks need 1 nesting box for every 4 to 5 hens. Make sure the nests have a deep clean layer of litter which helps control egg breakage and absorbs waste. Egg Collection Chickens are early layers with most of the eggs laid by 10:00 am. If possible, collect the eggs as soon as possible after laid. Sometimes you can’t collect until later in the day and that’s okay, however collecting early lessens the chance of breakage and the eggs becoming too dirty. I advise collecting eggs twice daily. Hens can develop egg eating habits. By collecting eggs often, the chance of breakage is less and you lessen the risk of the hens learning to eat an egg. Collect your eggs in an easy-to-clean container; plastic egg flats or wire baskets work great, and make sure you don’t stack your eggs too high. Never stack more than 5 layers deep. The higher you stack your eggs, the more likely breakage will occur. Egg Cleaning and Handling This is a hotly debated subject: should I wash my eggs? I never wash my eggs until right before I use them. Washing your eggs will cause them to go bad quicker. Brush them off before storing them, only if you have to. My best advice; store them the way you find them. Just before laying her eggs, the hen’s body adds a protective coating to the shell, known as bloom. Leaving this protective film on the eggs helps keep out bacteria and traps moisture inside the egg, resulting in a full, rich egg with a bright orange yolk. Many farmers never refrigerate their eggs because the bloom is so protective. Once you wash the egg or wipe it down too much, you destroy the bloom and the egg needs refrigeration. If you’ve ever been to Europe, you will notice, fresh eggs are never refrigerated because the farmers leave the bloom on them. A fresh egg with bloom intact will keep all high quality nutrients, when kept at room temperature, for up to three months. When you crack open a fresh egg, you’ll see a bright orange yolk and the albumen, or the jelly substance surrounding the yolk, is slightly cloudy. Quick Science Lessen The cloudiness of the egg white, or albumen, of a backyard egg looks cloudy. This means the fresh egg has carbon dioxide present. With a factory farmed egg, the albumen is clear. This means the egg was washed which allowed the carbon dioxide to escape through the porous shell or the egg is old. The more gas that escapes, the more transparent and runny the white will be. Commercial egg producers wash their eggs as well as running them through a chemical wash. These chemicals seep into the pores since the eggs are no longer protected by the bloom. The chemical washes cause a reaction in the egg. The yolk shrinks and turns pale, while the albumen becomes clear. Farm eggs may have a clear albumen as well but this usually means the clearer the albumen, the less fresh your egg is. Chilling or Not Chilling Whenever I tell people I don’t chill my eggs, they look at me like I’m crazy. Then I hear the usual questions…“ They’ll go bad, won’t they?” or “Won’t you get salmonella poisoning?” My answer: “If they’re backyard eggs…no.” The United States is one of the few countries requiring mass producers wash their eggs and keep them refrigerated. Once the protective coating is gone, the egg becomes susceptible to bacteria. All store-bought eggs need refrigeration or the risk of salmonella is high. Because of this, it’s important to understand the difference between a factory farmed egg and a backyard chicken farmer egg. Eggs shells are nothing more than permeable membranes with thousands of pores covering the surface. When the hen lays an egg, her body covers it with the protective bloom coating. This mucous secretion quickly dries after laying, to seal the shell’s pores. This makes it impervious to bacteria while reducing moisture loss. Moisture loss will speed up