Brooder Setup for Baby Chicks (Complete Beginner Guide)
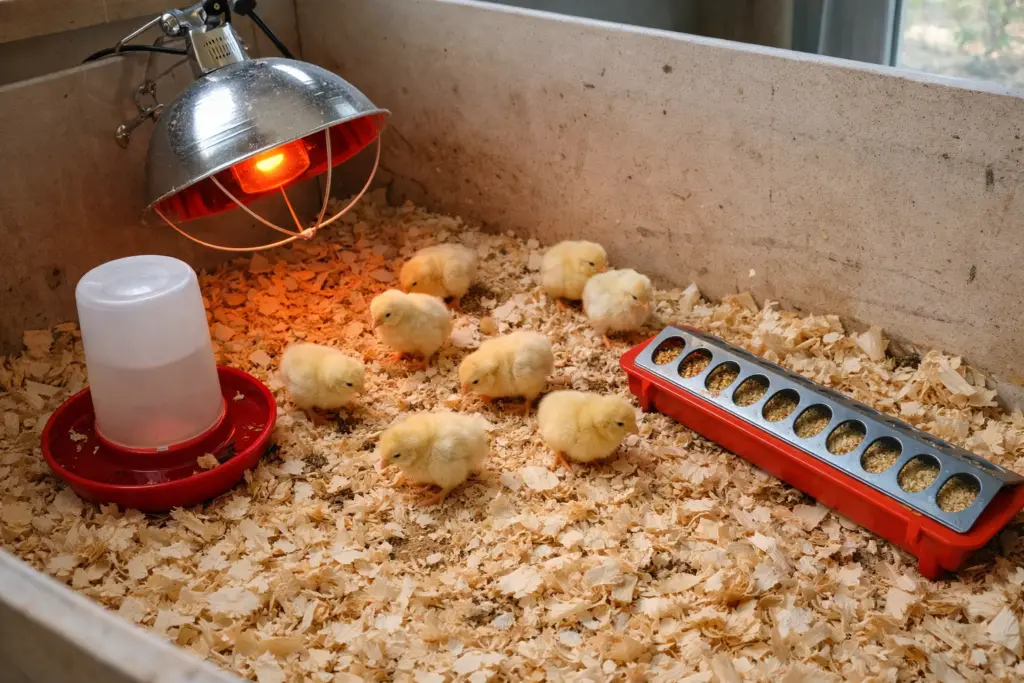
Disclosure: This post may contain affiliate links. If you purchase through these links, I may earn a small commission at no extra cost to you. Setting up a brooder is one of the most important steps in raising baby chicks, and it is where many beginners either set themselves up for success or run into avoidable problems. A good brooder gives chicks a stable, comfortable environment where they can grow quickly without stress. At the same time, a poorly set-up one can lead to issues with temperature, moisture, or overcrowding. You want a space that provides consistent warmth, clean bedding, easy access to food and water, and enough room for chicks to move freely as they grow. Once those basics are in place, raising chicks becomes much easier to manage day to day. If you have not purchased your chicks yet, start with our Where to Buy Baby Chicks article. The next article in the series, the Raising Baby Chicks for Beginners guide, will walk you through daily care once your brooder is up and running. What Is a Chick Brooder A brooder is a contained space that replaces the role of a mother hen during the first few weeks of a chick’s life. In nature, a hen provides warmth, protection, and guidance. In a backyard setup, your brooder takes over that job. This space needs to stay warm, dry, and safe at all times. Chicks will eat, drink, sleep, and grow inside it, so the setup should support those basic needs without causing stress or confusion. Step 1: Choose the Right Brooder Container You do not need anything complicated or expensive to get started, but the container you choose does need to work well for the space you have and the number of chicks you plan to raise. Many backyard chicken keepers use large plastic storage totes, stock tanks, wooden boxes, or livestock troughs. What matters most is that the sides are solid enough to block drafts and tall enough to prevent chicks from jumping out as they grow and become more active. Space is often underestimated at this stage. Chicks grow quickly, and a brooder that feels roomy during the first week can become crowded by three weeks. Giving your chicks enough space from the beginning helps reduce stress, limits pecking behavior, and keeps the environment cleaner. Step 2: Add Safe, Absorbent Bedding Bedding is more than just something to cover the floor. It plays a major role in keeping chicks dry, comfortable, and healthy. Pine shavings are among the most reliable bedding options because they absorb moisture well and provide a textured surface that helps chicks maintain proper footing. Slick flooring, like plastic and plain newspaper, can contribute to leg problems. A thick layer of pine shavings is vital to keeping your chicks safe and healthy and to avoiding long-term issues. The bedding also makes it easier to spot-clean wet areas and keep the brooder from developing odor problems. Learn more about the best bedding for your chicken coop in our Chicken Coop Bedding Guide for Beginners. Step 3: Install a Heat Source Correctly Heat is the most critical element in your brooder setup, especially during the first week. Typically, chicks will need this heat source for 4-6 weeks or until they get all their feathers. Since chicks cannot regulate their body temperature when young, they rely entirely on an external heat source. Without consistent warmth, they can become chilled, leading to stress and potential loss. Heat lamps are commonly used and can work very well when installed correctly. Brooder heat plates are another option that provides a more controlled and lower-risk heat source. The key is placement. The heat source should warm only part of the brooder, not the entire space. This creates a temperature gradient, allowing chicks to move toward warmth when they need it and away from it when they do not. Step 4: Set the Correct Temperature Temperature should always be measured at chick level, not above the brooder. During the first week, aim for about 95°F in the warm zone, then gradually reduce the temperature each week as chicks develop feathers and become more independent. 🐣 Age 🌡️ Temperature 📌 What to Watch Week 1 95°F Chicks spread evenly and stay active Week 2 90°F Less clustering, more movement Week 3 85°F Feather growth increases Week 4 80°F More independence Week 5–6 75°F Preparing for outdoor transition Watching chick behavior is just as important as checking the thermometer. Comfortable chicks will move freely, eat, drink, and rest without crowding or avoiding specific areas. Step 5: Add Feeders and Waterers Chicks need constant access to clean feed and water, and where you place them in the brooder affects how well they use them. Use chick-sized feeders and shallow waterers designed for safety. If the water is too deep, young chicks can fall in and drown. Place them slightly away from the heat source so chicks do not crowd into one area, which helps reduce spills and keeps bedding drier. 💡 Beginner Tip Keep feed and water slightly separated inside the brooder. This helps reduce spills and keeps bedding drier longer. Step 6: Plan the Brooder Layout A well-planned layout gives chicks options and keeps the space balanced. Position the heat source on one side, place feed and water in an accessible area nearby, and leave open space for movement. This setup allows chicks to regulate their own comfort and reduces stress within the group. Even a simple layout works well when each element is placed with purpose. Step 7: Test Everything Before Chicks Arrive Before bringing chicks home, run the brooder for several hours and check that everything works as expected. Look at temperature stability, equipment placement, airflow, and overall safety. Making adjustments ahead of time is much easier than trying to fix problems after chicks are already in the brooder. Brooder Safety (Do Not Skip This) Safety deserves careful attention, especially when using heat lamps. Secure the lamp firmly so it cannot
Raising Baby Chicks for Beginners (Week-by-Week Guide)
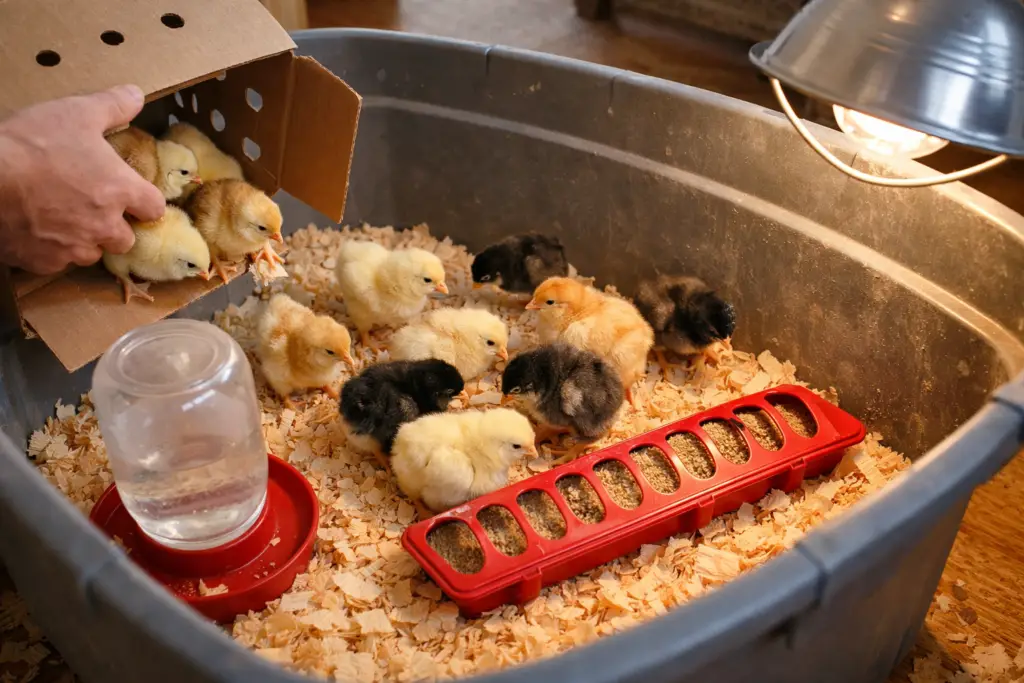
Disclosure: This post may contain affiliate links. If you purchase through these links, I may earn a small commission at no extra cost to you. Bringing home baby chicks is exciting, but the first few weeks are when beginners either build confidence or run into problems. Chicks are hardy in some ways, but they require more maintenance at the start, needing steady heat, clean water, the right feed, dry bedding, enough space, and close observation. Most chick losses happen when one of those basics slips. All extension guidance stresses that temperature, space, dryness, and clean feed and water are the foundation of successful brooding. Before You Bring Chicks Home The biggest beginner mistake is buying chicks first and setting up later. To have a better chance of success with your baby chicks, you must have everything ready before they arrive. Your brooder should be fully assembled, bedded, heated, and tested before the chicks arrive. That means the heat source is on, the temperature is stable, the feeder and waterer are in place, and you already know where the chicks will stay for the next several weeks. Some of the best advice is to start studying and planning late fall or early winter, so you have enough time to get your chicks’ new home ready. If you are getting chicks by mail, timing matters even more. USPS permits the mailing of certain day-old poultry, but those chicks are perishable and time-sensitive. In practice, many hatchery shipments are held for pickup at your local post office, so you need to be ready to go pick them up promptly when they arrive. Do not schedule a shipment for a day when you will be away from home, hard to reach by phone, or unable to get to the post office quickly. Chicks have 1-2 days in transit, so they will be without water and food, making it vital to be there to get them home. A beginner should have these things ready before the chicks arrive: What To Do the Minute Chicks Arrive Whether you picked chicks up at a feed store or brought them home from the post office, your first job is not to admire them. Your first job is to get them warm and drinking. Gently place them into the brooder right away. If they were shipped, dip each beak lightly into the water so the chick learns where the water source is. Shipping is stressful, and hydration comes first. Feed should be available immediately, too, but water is the urgent need. Good hatcheries and extension programs both emphasize getting chicks settled quickly and minimizing stress after transport. Then step back and watch them for fifteen to twenty minutes. Their behavior will tell you a lot. If they pile tightly under the heat, they are cold. If they avoid the heated area and spread to the edges, they are too hot. If they move around, peep softly, eat, drink, and rest comfortably, the setup is close to right. Extension guidance specifically recommends using chick behavior, not just thermometer readings, to judge brooder comfort. Setting Up a Brooder the Right Way A brooder is simply a safe, draft-protected space that gives chicks heat, bedding, feed, water, and room to move. For a small backyard flock, a stock tank, large tote, livestock trough, or homemade brooder box can work. What matters most is safety and function. The floor should not be slick. Oklahoma State University Extension notes that chicks need absorbent bedding and warns against slick surfaces such as plain newspaper, which can contribute to leg problems. Cedar is also a poor choice because of irritating fumes. Pine shavings are a solid beginner option because they absorb moisture well and are easy to replace. Lay down enough bedding to keep the floor dry, then quickly change wet spots. Chicks spend a lot of time on the floor, so damp bedding quickly becomes a health problem. Space matters more than beginners expect because chicks grow quickly. Penn State Extension notes that space needs increase as birds grow, and Minnesota guidance also stresses allowing enough room under and around the heat source so chicks can choose their comfort zone. Brooder Setup Chart 🐣 Brooder Need What Beginners Should Do Heat Preheat the brooder before chicks arrive and keep one warm zone available at all times Bedding Use dry, absorbent bedding like pine shavings and replace wet spots quickly Water Use a shallow waterer and check it several times a day Feed Keep chick starter available at all times and keep it clean and dry Space Give chicks room to move away from heat, eat, drink, and rest without crowding Temperature Is the Make-or-Break Issue For week one, most extension sources recommend a brooder temperature around 90° to 95° Fahrenheit at chick level, then lowering it by 5° each week as the chicks feather out. Penn State, Minnesota, Oklahoma State, and Purdue all give essentially the same week-by-week pattern, with small differences depending on conditions and the heat source. What matters here is not just the number. It is where you measure it. Take the temperature near the chick level under the heat source, while Purdue notes measuring near the floor. That matters because a brooder can feel very different at floor level than it does a foot higher. 🌡️ Chick Age Recommended Brooder Temperature What You Should Watch For Week 1 90 to 95°F Chicks should eat, drink, sleep, and move comfortably without piling Week 2 85 to 90°F More movement and confidence, less constant clustering Week 3 80 to 85°F Feathers begin replacing fluff and chicks roam more Week 4 75 to 80°F Chicks need more space and less constant heat Week 5 70 to 75°F Many chicks are close to transition if fully feathered Week 6 Around room or ambient warmth if weather allows Outdoor transition depends on feathering and weather, not just age And because you wanted a how-to article, here is the practical part beginners need to hear: Do not