How to Introduce New Chickens to Your Flock (Step-by-Step Guide)
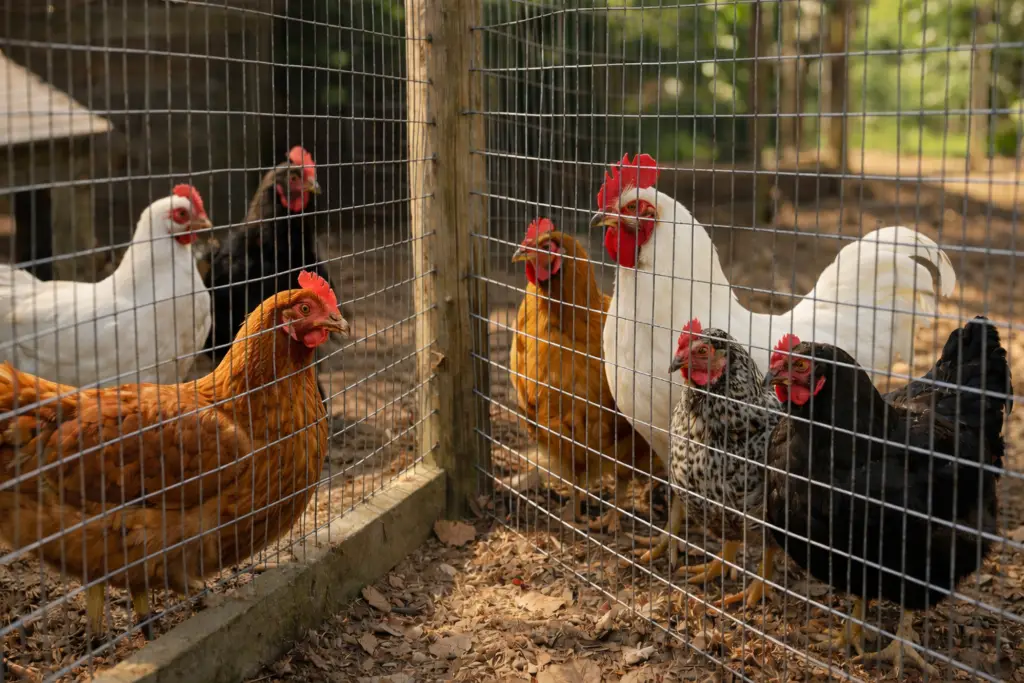
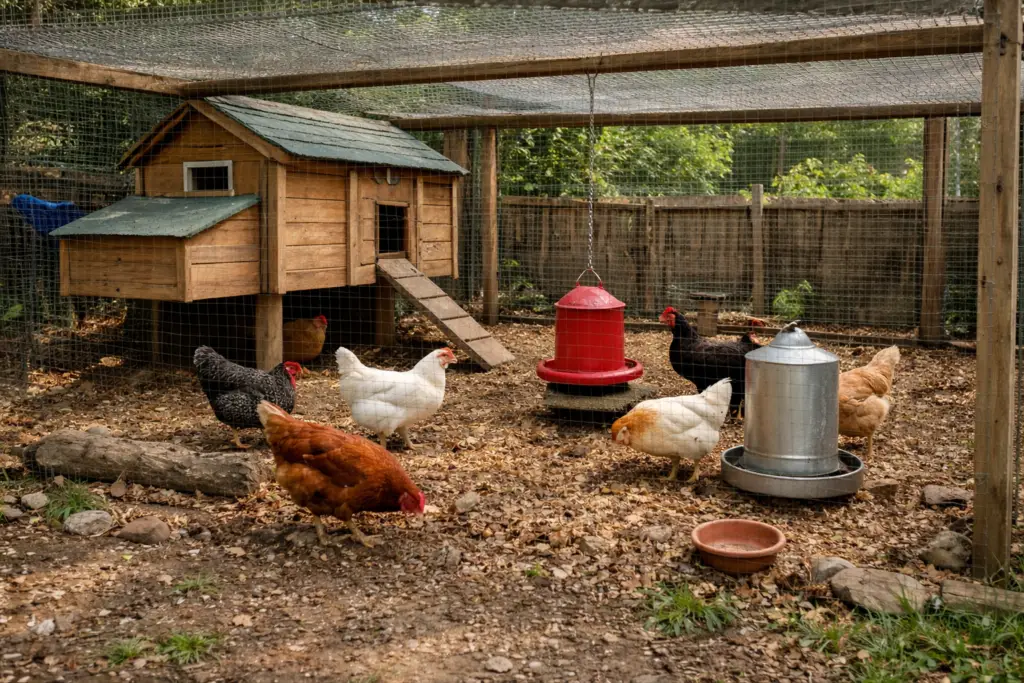
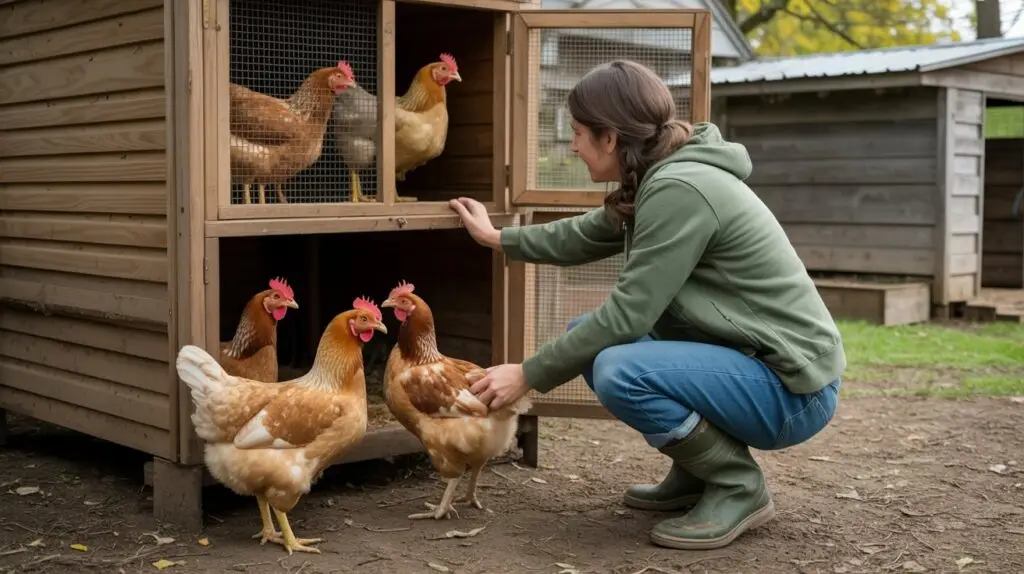
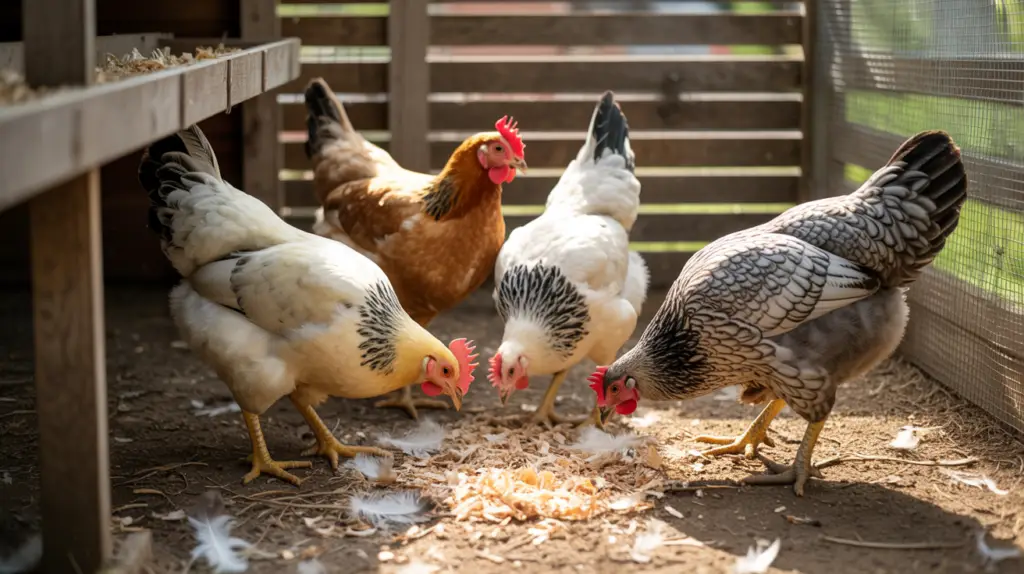
Disclosure: This post may contain affiliate links. If you purchase through these links, I may earn a small commission at no extra cost to you. Introducing new chickens to an existing flock is one of the most important skills a backyard chicken keeper can learn. But it is also one of the easiest places to run into problems if the process is rushed or handled without a clear plan. Chickens live by a social structure known as the pecking order. Every time new birds are added, that structure has to be re-established. This process includes pecking, chasing, and posturing, all of which are normal behaviors. The goal is not to eliminate those behaviors, but to manage them so they do not turn into injuries or long-term stress. A slow, structured introduction allows the flock to adjust in stages. When done correctly, the process becomes predictable and much easier to manage. If your new birds are coming from the brooder, make sure they are fully feathered and ready for outdoor life. Learn what you need to know with our Raising Baby Chicks for Beginners and Brooder Setup Guide. When to Introduce New Chickens Timing plays a major role in how smoothly the introduction goes. New chickens should be close in size to your existing flock. Smaller birds are more likely to be targeted and have difficulty avoiding aggressive behavior. Waiting until younger birds are strong, fully feathered, and able to move confidently gives them a better chance to integrate successfully. Weather conditions matter as well. Choose a period of mild, stable weather so your flock is not dealing with additional stress from heat or cold. Chickens adjust more easily when their environment is consistent. Before starting, make sure your coop and run are ready. Birds need enough space to move freely and avoid each other when necessary. If your setup feels crowded, fix that first. When building your coop and run, check out our Chicken Predators and How to Protect Your Flock article to ensure everything is secure. Step 1: Prepare a Separate Holding Area New chickens should always start in their own space before joining the flock. Set up a separate holding area that is secure, dry, and completely independent from your main coop and run. This area does not need to be large or permanent, though it should allow the birds to eat, drink, and move comfortably. Use this time to observe the new chickens closely. Make sure they are eating well, staying active, and showing no signs of illness. This period also helps them recover from transport and adjust to their new environment before facing the stress of introduction. Keep everything separate during this stage, including feeders and waterers. Starting with a clean separation gives you control and prevents problems that are harder to fix later. Step 2: Set Up Visual Contact Once the new chickens are settled, allow them to see the flock without direct contact. Place the new birds inside a section of your run or behind a wire barrier where both groups can observe each other safely. This allows the chickens to become familiar with each other’s presence without triggering immediate conflict. Over several days, the birds will begin to pay attention to each other. You may see pacing, staring, or curiosity along the barrier. These behaviors are part of the adjustment process and help reduce the intensity of the first physical interaction. Give this stage enough time to work. Rushing it often leads to more aggressive encounters later. Step 3: Begin Short, Controlled Introductions When both groups appear calm during visual contact, you can begin short introductions. Choose a time when you can stay nearby and watch closely. Allow the chickens to interact in a space that gives them room to move, such as a run or open yard. Avoid tight areas where birds cannot get away from each other. Keep the first sessions short. Ten to fifteen minutes is enough to observe how the birds respond. Expect some pecking and chasing, as this is how chickens begin to establish their social structure. End each session before tension builds too much. Returning birds to their separate spaces keeps the process controlled and prevents early conflicts from escalating. Step 4: Watch Behavior and Step In When Needed As introductions continue, your focus should shift to observing patterns rather than reacting to every interaction. Chickens will naturally establish their pecking order through short pecks and brief chases. These behaviors are expected and usually resolve on their own. What matters is whether the behavior improves over time or becomes more aggressive. Pay close attention to how the birds function as a group. All chickens should be able to move freely, eat, drink, and rest without being constantly harassed. A bird that is repeatedly targeted or unable to access food needs immediate attention. This table will help you quickly identify what is normal and what requires intervention: 🐔 Behavior ✅ Normal ⚠️ Problem Pecking Short pecks, brief chasing Repeated attacks, injury Chasing Stops quickly Constant pursuit Feeding All birds eat eventually One bird blocked from food Movement Birds move freely One bird hiding constantly If behavior becomes aggressive or does not improve, separate the birds and return to the previous step. Slowing the process often resolves the issue. 💡 Important Tip Focus on behavior over time instead of reacting to every peck. Chickens need time to establish order, and short interactions are part of that process. Step 5: Add Extra Feeders and Waterers As birds begin spending more time together, competition for food and water can increase. Chickens higher in the pecking order may try to control access, which can create stress for new birds. Adding multiple feeders and waterers in different areas of the run helps reduce this pressure. Spread them out so birds are not forced into one location. This allows lower-ranking chickens to eat and drink without constant interference. Step 6: Increase Time Together Gradually As introductions improve, begin increasing the amount of time the
Brooder Setup for Baby Chicks (Complete Beginner Guide)
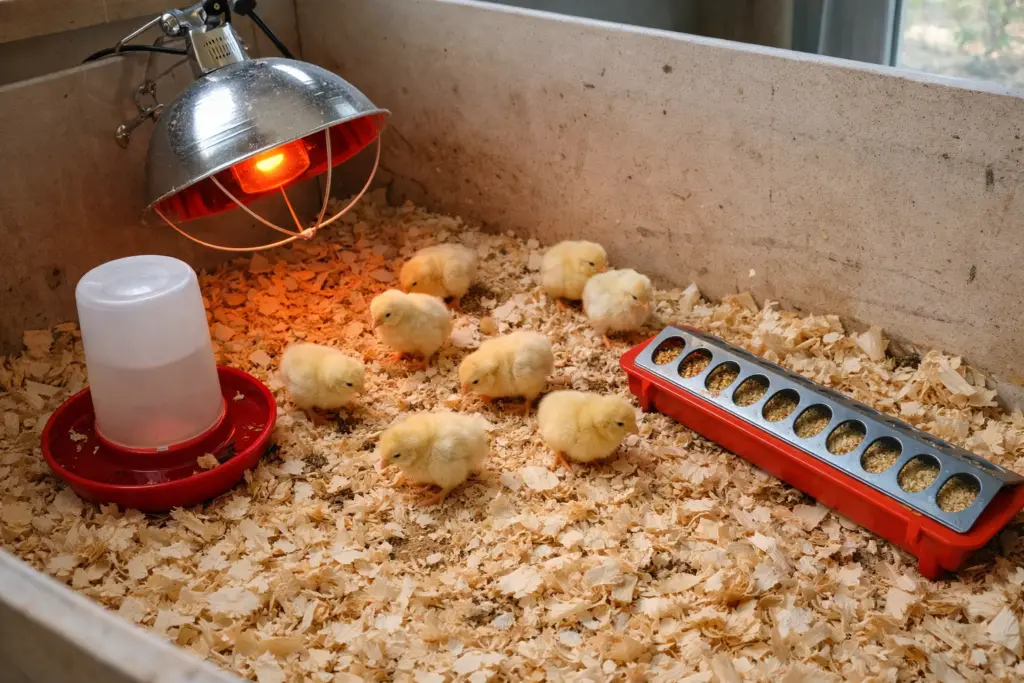
Disclosure: This post may contain affiliate links. If you purchase through these links, I may earn a small commission at no extra cost to you. Setting up a brooder is one of the most important steps in raising baby chicks, and it is where many beginners either set themselves up for success or run into avoidable problems. A good brooder gives chicks a stable, comfortable environment where they can grow quickly without stress. At the same time, a poorly set-up one can lead to issues with temperature, moisture, or overcrowding. You want a space that provides consistent warmth, clean bedding, easy access to food and water, and enough room for chicks to move freely as they grow. Once those basics are in place, raising chicks becomes much easier to manage day to day. If you have not purchased your chicks yet, start with our Where to Buy Baby Chicks article. The next article in the series, the Raising Baby Chicks for Beginners guide, will walk you through daily care once your brooder is up and running. What Is a Chick Brooder A brooder is a contained space that replaces the role of a mother hen during the first few weeks of a chick’s life. In nature, a hen provides warmth, protection, and guidance. In a backyard setup, your brooder takes over that job. This space needs to stay warm, dry, and safe at all times. Chicks will eat, drink, sleep, and grow inside it, so the setup should support those basic needs without causing stress or confusion. Step 1: Choose the Right Brooder Container You do not need anything complicated or expensive to get started, but the container you choose does need to work well for the space you have and the number of chicks you plan to raise. Many backyard chicken keepers use large plastic storage totes, stock tanks, wooden boxes, or livestock troughs. What matters most is that the sides are solid enough to block drafts and tall enough to prevent chicks from jumping out as they grow and become more active. Space is often underestimated at this stage. Chicks grow quickly, and a brooder that feels roomy during the first week can become crowded by three weeks. Giving your chicks enough space from the beginning helps reduce stress, limits pecking behavior, and keeps the environment cleaner. Step 2: Add Safe, Absorbent Bedding Bedding is more than just something to cover the floor. It plays a major role in keeping chicks dry, comfortable, and healthy. Pine shavings are among the most reliable bedding options because they absorb moisture well and provide a textured surface that helps chicks maintain proper footing. Slick flooring, like plastic and plain newspaper, can contribute to leg problems. A thick layer of pine shavings is vital to keeping your chicks safe and healthy and to avoiding long-term issues. The bedding also makes it easier to spot-clean wet areas and keep the brooder from developing odor problems. Learn more about the best bedding for your chicken coop in our Chicken Coop Bedding Guide for Beginners. Step 3: Install a Heat Source Correctly Heat is the most critical element in your brooder setup, especially during the first week. Typically, chicks will need this heat source for 4-6 weeks or until they get all their feathers. Since chicks cannot regulate their body temperature when young, they rely entirely on an external heat source. Without consistent warmth, they can become chilled, leading to stress and potential loss. Heat lamps are commonly used and can work very well when installed correctly. Brooder heat plates are another option that provides a more controlled and lower-risk heat source. The key is placement. The heat source should warm only part of the brooder, not the entire space. This creates a temperature gradient, allowing chicks to move toward warmth when they need it and away from it when they do not. Step 4: Set the Correct Temperature Temperature should always be measured at chick level, not above the brooder. During the first week, aim for about 95°F in the warm zone, then gradually reduce the temperature each week as chicks develop feathers and become more independent. 🐣 Age 🌡️ Temperature 📌 What to Watch Week 1 95°F Chicks spread evenly and stay active Week 2 90°F Less clustering, more movement Week 3 85°F Feather growth increases Week 4 80°F More independence Week 5–6 75°F Preparing for outdoor transition Watching chick behavior is just as important as checking the thermometer. Comfortable chicks will move freely, eat, drink, and rest without crowding or avoiding specific areas. Step 5: Add Feeders and Waterers Chicks need constant access to clean feed and water, and where you place them in the brooder affects how well they use them. Use chick-sized feeders and shallow waterers designed for safety. If the water is too deep, young chicks can fall in and drown. Place them slightly away from the heat source so chicks do not crowd into one area, which helps reduce spills and keeps bedding drier. 💡 Beginner Tip Keep feed and water slightly separated inside the brooder. This helps reduce spills and keeps bedding drier longer. Step 6: Plan the Brooder Layout A well-planned layout gives chicks options and keeps the space balanced. Position the heat source on one side, place feed and water in an accessible area nearby, and leave open space for movement. This setup allows chicks to regulate their own comfort and reduces stress within the group. Even a simple layout works well when each element is placed with purpose. Step 7: Test Everything Before Chicks Arrive Before bringing chicks home, run the brooder for several hours and check that everything works as expected. Look at temperature stability, equipment placement, airflow, and overall safety. Making adjustments ahead of time is much easier than trying to fix problems after chicks are already in the brooder. Brooder Safety (Do Not Skip This) Safety deserves careful attention, especially when using heat lamps. Secure the lamp firmly so it cannot
Raising Baby Chicks for Beginners (Week-by-Week Guide)
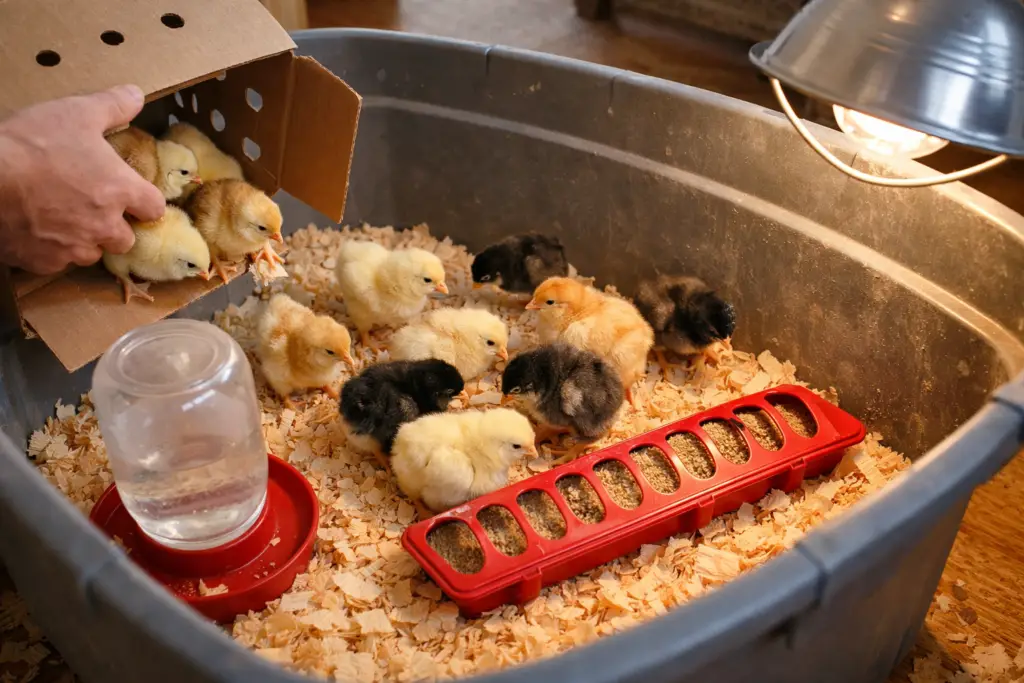
Disclosure: This post may contain affiliate links. If you purchase through these links, I may earn a small commission at no extra cost to you. Bringing home baby chicks is exciting, but the first few weeks are when beginners either build confidence or run into problems. Chicks are hardy in some ways, but they require more maintenance at the start, needing steady heat, clean water, the right feed, dry bedding, enough space, and close observation. Most chick losses happen when one of those basics slips. All extension guidance stresses that temperature, space, dryness, and clean feed and water are the foundation of successful brooding. Before You Bring Chicks Home The biggest beginner mistake is buying chicks first and setting up later. To have a better chance of success with your baby chicks, you must have everything ready before they arrive. Your brooder should be fully assembled, bedded, heated, and tested before the chicks arrive. That means the heat source is on, the temperature is stable, the feeder and waterer are in place, and you already know where the chicks will stay for the next several weeks. Some of the best advice is to start studying and planning late fall or early winter, so you have enough time to get your chicks’ new home ready. If you are getting chicks by mail, timing matters even more. USPS permits the mailing of certain day-old poultry, but those chicks are perishable and time-sensitive. In practice, many hatchery shipments are held for pickup at your local post office, so you need to be ready to go pick them up promptly when they arrive. Do not schedule a shipment for a day when you will be away from home, hard to reach by phone, or unable to get to the post office quickly. Chicks have 1-2 days in transit, so they will be without water and food, making it vital to be there to get them home. A beginner should have these things ready before the chicks arrive: What To Do the Minute Chicks Arrive Whether you picked chicks up at a feed store or brought them home from the post office, your first job is not to admire them. Your first job is to get them warm and drinking. Gently place them into the brooder right away. If they were shipped, dip each beak lightly into the water so the chick learns where the water source is. Shipping is stressful, and hydration comes first. Feed should be available immediately, too, but water is the urgent need. Good hatcheries and extension programs both emphasize getting chicks settled quickly and minimizing stress after transport. Then step back and watch them for fifteen to twenty minutes. Their behavior will tell you a lot. If they pile tightly under the heat, they are cold. If they avoid the heated area and spread to the edges, they are too hot. If they move around, peep softly, eat, drink, and rest comfortably, the setup is close to right. Extension guidance specifically recommends using chick behavior, not just thermometer readings, to judge brooder comfort. Setting Up a Brooder the Right Way A brooder is simply a safe, draft-protected space that gives chicks heat, bedding, feed, water, and room to move. For a small backyard flock, a stock tank, large tote, livestock trough, or homemade brooder box can work. What matters most is safety and function. The floor should not be slick. Oklahoma State University Extension notes that chicks need absorbent bedding and warns against slick surfaces such as plain newspaper, which can contribute to leg problems. Cedar is also a poor choice because of irritating fumes. Pine shavings are a solid beginner option because they absorb moisture well and are easy to replace. Lay down enough bedding to keep the floor dry, then quickly change wet spots. Chicks spend a lot of time on the floor, so damp bedding quickly becomes a health problem. Space matters more than beginners expect because chicks grow quickly. Penn State Extension notes that space needs increase as birds grow, and Minnesota guidance also stresses allowing enough room under and around the heat source so chicks can choose their comfort zone. Brooder Setup Chart 🐣 Brooder Need What Beginners Should Do Heat Preheat the brooder before chicks arrive and keep one warm zone available at all times Bedding Use dry, absorbent bedding like pine shavings and replace wet spots quickly Water Use a shallow waterer and check it several times a day Feed Keep chick starter available at all times and keep it clean and dry Space Give chicks room to move away from heat, eat, drink, and rest without crowding Temperature Is the Make-or-Break Issue For week one, most extension sources recommend a brooder temperature around 90° to 95° Fahrenheit at chick level, then lowering it by 5° each week as the chicks feather out. Penn State, Minnesota, Oklahoma State, and Purdue all give essentially the same week-by-week pattern, with small differences depending on conditions and the heat source. What matters here is not just the number. It is where you measure it. Take the temperature near the chick level under the heat source, while Purdue notes measuring near the floor. That matters because a brooder can feel very different at floor level than it does a foot higher. 🌡️ Chick Age Recommended Brooder Temperature What You Should Watch For Week 1 90 to 95°F Chicks should eat, drink, sleep, and move comfortably without piling Week 2 85 to 90°F More movement and confidence, less constant clustering Week 3 80 to 85°F Feathers begin replacing fluff and chicks roam more Week 4 75 to 80°F Chicks need more space and less constant heat Week 5 70 to 75°F Many chicks are close to transition if fully feathered Week 6 Around room or ambient warmth if weather allows Outdoor transition depends on feathering and weather, not just age And because you wanted a how-to article, here is the practical part beginners need to hear: Do not
Where to Buy Baby Chicks (Beginner Guide)
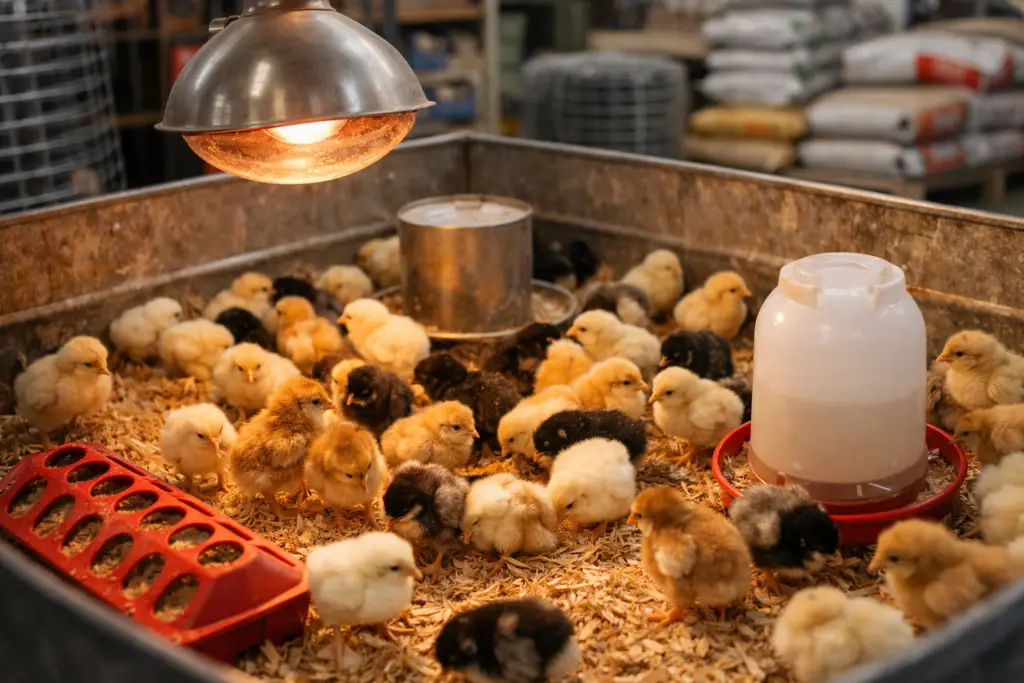
Disclosure: This post may contain affiliate links. If you purchase through these links, I may earn a small commission at no extra cost to you. Buying baby chicks is one of the most exciting parts of starting a backyard flock. It is also where many beginners make mistakes. Where you buy your chicks matters more than most people realize. Healthy birds, the right breed, and proper handling early on all make a difference in how your flock performs later. After you buy your birds, read our guide on raising baby chicks for beginners so you are ready before they arrive. If you are just getting started, make sure your setup is ready before you bring chicks home. Our Complete Beginner Guide to Raising Chickens walks you through everything you need before your first purchase. Best Places to Buy Baby Chicks 🐔 Source 👍 Pros ⚠️ Cons ⭐ Best For Feed Stores Immediate access, see chicks in person Limited breed selection Beginners who want simple setup Hatcheries Wide variety, sexed chicks, shipped Shipping time, minimum orders Specific breeds or larger flocks Local Breeders Locally adapted birds, small batches Harder to find, limited availability Custom or heritage flocks There are three main options, and each has its advantages. Local Feed Stores and Farm Supply Stores Local feed stores are one of the easiest ways to get started. Stores like Tractor Supply Co. and local feed stores often carry chicks in the spring, especially in areas like Texas, California, Florida, and Georgia, where backyard flocks are common. You can see the chicks in person, which gives you a chance to observe their behavior and condition before buying. There are no shipping costs, and you can take them home the same day. The downside is limited breed selection. You usually get a small group of common breeds, and availability depends on timing. For specialty or Heritage breeds, your best chance of getting what you want is by ordering through an online hatchery. Reputable Hatcheries Ordering from hatcheries gives you access to a much wider range of breeds. Well-known options include My Pet Chicken, Meyer Hatchery, and Murray McMurray Hatchery. Hatcheries typically offer more breed choices, sexed chicks (pullets), vaccinated chicks, and scheduled shipping. Chicks are shipped shortly after hatching and arrive within a few days. One thing to keep in mind is the minimum order sizes. Many hatcheries require larger orders to ensure chicks stay warm during shipping. Local Breeders Local breeders are often overlooked, but they can be a great option. Organizations like the American Poultry Association and The Livestock Conservancy can help you find breeders in your area. Buying from a breeder often means better-adapted birds for your climate and smaller purchase quantities. When you get your birds from a breeder, you have more insight into how the birds were raised. Availability varies, so you may need to plan. What to Look For When Choosing Healthy Chicks When you are standing at a brooder tank in a store or receiving chicks from a shipment, take a few minutes to observe them. Healthy chicks are active and alert. Look for bright eyes, clean fluffy feathers, and chicks that move around with curiosity. They should be steady on their feet and responsive to movement. Unhealthy chicks often stand out once you know what to watch for. They may appear sleepy, huddled, or reluctant to move. Any signs of coughing, labored breathing, or dirty vent areas should raise concerns. Taking the time to choose strong, healthy chicks saves you problems later. ✅ Healthy Chick ⚠️ Warning Signs Bright, clear eyes Dull or closed eyes Active and curious Lethargic or huddled Clean, fluffy feathers Dirty or matted feathers Steady movement Weak or unbalanced Choosing the Right Breed for Your Needs Before you buy chicks, think about what you want from your flock. Some people want eggs while others want calm, friendly birds. Some backyard chicken farmers want hardy chickens that can handle tough weather. Breed choice affects egg production, temperament, climate tolerance, and long-term maintenance. If your goal is egg production, focus on reliable layers like the Rhode Island Red or Leghorn. Buff Orpingtons, Silkies, Cochins, and Brahmas are best if you want a more relaxed backyard flock. Best Chicken Breeds for Hot Climates If you live in a hot climate like Texas or Oklahoma, breed choice becomes even more important. Heat stress is one of the biggest challenges backyard flocks face in the southern regions of the country. Some chickens handle it well, while others struggle. Good heat-tolerant breeds share a few key traits, such as larger combs and wattles that release body heat, lighter body weight, and active, alert behavior. These features help chickens regulate their body temperature more effectively than other breeds. Some of the best heat-tolerant breeds include light-bodied birds with large combs, like the Leghorns, Andalusians, Minorcas, and Egyptian Fayoumis. Good heat-tolerant egg-laying breeds include Naked Necks (Turkens), Easter Eggers, and Rhode Island Reds. These birds handle high temperatures and still maintain good egg production. Recommended Heat-Tolerant Breeds 🌡️ Breed 🔥 Heat Tolerance 🥚 Egg Production ⭐ Notes Leghorn Excellent High Lightweight and very active Andalusian Excellent Moderate Well adapted to warm climates Naked Neck Excellent Moderate Less feathering helps cooling OEGB Excellent Low Small size handles heat well Leghorns are one of the best choices for hot climates. They are light-bodied, active, and excellent egg layers. Andalusians are another strong option. They are well adapted to warm weather and handle heat better than heavier breeds. Naked Necks stand out because they have less feather coverage, which helps them stay cooler in extreme temperatures. Old English Game Bantams (OEGBs) are small and efficient birds that tolerate heat well due to their size and body structure. Other good options include Mediterranean-type breeds, which are well-suited to warmer climates. Hot Weather Chick Care and Setup Raising chicks in warm climates requires a slightly different approach. Ventilation becomes more important than insulation. Your brooder and coop should allow airflow without exposing chicks to drafts. Fresh
Chicken Predators and How to Protect Your Flock
Disclosure: This post may contain affiliate links. If you purchase through these links, I may earn a small commission at no extra cost to you. Losing a chicken to a predator is one of the fastest ways to learn how important coop security really is. Most beginners assume their setup is good enough until something tests it. Unfortunately, predators only need one weak spot. A small gap, a loose latch, or a shallow fence can turn into a problem overnight. The good news is that most predator losses are preventable. Once you understand what you are up against and how predators behave, you can build a setup that keeps your flock safe without making things complicated. If you are still building your setup, start with the Complete Beginner Guide to Raising Chickens, then come back here to secure everything properly. Why Predator Protection Matters More Than You Think Predators are a common occurrence everywhere. Even in suburban areas, you deal with raccoons, neighborhood dogs, hawks, and other opportunistic animals. They do not need an invitation, and they are always looking for an easy meal. What surprises most new chicken keepers is how persistent predators are. If they find your coop once, they will come back again and again until they succeed in breaking inside. That is why predator protection is not just about reacting after a loss. It is about building a system that prevents problems from happening in the first place. Common Chicken Predators (And How They Hunt) Understanding predator behavior is the key to stopping them. Different animals attack in different ways. Some dig. Some climb. Some strike from above. Knowing this helps you build the right defenses. Raccoons Raccoons are among the most dangerous predators of backyard flocks. They are nocturnal and incredibly smart. They can open simple latches, reach through wire, and pull chickens apart without even entering the coop. Raccoons usually attack after dark and target weak points such as doors, vents, and loose wires. If one gets inside your coop, it often kills multiple birds in one night. Foxes Foxes are patient and quiet hunters. They typically attack at dawn or dusk and will dig under fences to reach your chickens. Unlike raccoons, foxes often grab a bird and carry it off. If you lose a chicken without a trace, a fox is often the cause. Hawks Hawks are daytime predators. They hunt from above and can strike quickly when chickens are out in the open. Free-ranging flocks are especially vulnerable. A hawk attack usually leaves scattered feathers and little else. Weasels Weasels are small but extremely dangerous. They can squeeze through very small openings, often less than an inch wide, and typically kill multiple chickens in a single attack, leaving bodies behind. These attacks often happen at night and can be devastating. Dogs Dogs are unpredictable predators. Even friendly pets may chase and kill chickens out of instinct. Unlike other predators, dogs often kill multiple birds without eating them. A single loose dog can wipe out an entire flock in minutes. Signs You Have a Predator Problem Most predator issues leave clues. You might notice disturbed bedding, missing birds, or feathers scattered around your yard. Damage to your coop, such as bent wire or dug-out areas, is another warning sign. If something feels off, trust that instinct. Predators often test a coop before making a full attack. How to Predator-Proof Your Chicken Coop A secure coop is your first line of defense. This is where your chickens sleep, and it needs to be as safe as possible. Use Hardware Cloth, Not Chicken Wire This is one of the most important upgrades you can make. Chicken wire is designed to keep chickens in, but does not keep predators out. Hardware cloth, with small openings, prevents animals from reaching through or tearing it apart. Use it on windows, vents, and any exposed areas. Secure Every Opening Predators look for gaps. Check your coop for loose boards, gaps around doors, openings near the roof, and weak corners. Even a small gap can become a problem, especially with animals like weasels. Install Strong Latches Simple latches are not enough. Raccoons can easily open basic locks. Use secure latches and locks that can’t be opened with a simple pull. Protect the Floor Predators dig, so you must ensure your coop floor is protected. For a secure floor, bury hardware cloth around the perimeter of the coop and add a wire apron that extends outward. The added hardware cloth helps prevent animals from digging under the coop walls. How to Secure Your Chicken Run Your run is where chickens spend most of their time. Take the time to give extra consideration to the protection needed from both ground and aerial predators. Cover the Run An open run invites hawks and other raptor birds. These hunting birds can decimate an entire flock in a single day. Adding netting or wire across the top creates a physical barrier that prevents aerial attacks. Prevent Digging Just like the coop, your run needs protection below ground. A buried barrier or apron made of hardware cloth around the edges of your coop and run stops animals like foxes from digging their way in. Keep It Clean and Dry Predators are attracted to easy opportunities. If your run has excess food, standing water, or waste buildup, it becomes more appealing. Get into a routine of keeping the run clean, which is easily accomplished during your regular chicken coop cleanings. If you have not yet set a cleaning schedule, read How to Clean a Chicken Coop to build a simple one. Electric Fencing (When You Need Extra Protection) If you live in an area with a heavy predator presence, electric fencing can be a strong upgrade. A low-voltage poultry fence can deter animals like raccoons, foxes, and even dogs. It works as a psychological barrier. Once a predator touches it, the fence does the trick, and the predator usually does not come back. This is especially
How to Clean a Chicken Coop (Step-by-Step for Beginners)
Disclosure: This post may contain affiliate links. If you purchase through these links, I may earn a small commission at no extra cost to you. If your chicken coop smells bad, looks messy, or starts attracting flies, it is time to clean it. The good news is that cleaning a chicken coop is not complicated. Once you have a simple routine, it becomes one of the easiest parts of keeping backyard chickens. Most beginners either clean too little or make it harder than it needs to be. This guide walks you through exactly what to do, step by step, so you can keep your coop clean without wasting time. If you are still setting up your coop, start with our Complete Beginner Guide to Raising Chickens, so you have the basics covered before your first deep clean. What You Need to Clean a Chicken Coop Before you start, gather a few basic supplies. Nothing fancy, just some things to make the chicken coop setup more organized. 🧰 Item 💡 Purpose Shovel or scoop Remove old bedding Bucket or wheelbarrow Carry waste out of coop Brush or scraper Loosen stuck debris Water hose or spray bottle Rinse surfaces Mild cleaning solution Disinfect coop Fresh bedding Replace old material If you are unsure what bedding to use, see our guide to chicken coop bedding for beginners, which breaks down the best options. How Often Should You Clean a Chicken Coop Most coops follow a simple schedule. Hot weather, rain, or a crowded coop may require more frequent cleaning. If your coop smells strong or feels damp, do not wait. Clean it promptly to prevent respiratory illness in your flock. Step-by-Step: How to Clean a Chicken Coop This process is simple and repeatable. Once you get a regular cleaning schedule going, you’ll be surprised at how easy it is to keep a backyard chicken flock. Step 1: Remove the Chickens Let your chickens out into the run or yard. This gives you space to work and keeps them from getting in the way. Step 2: Remove Old Bedding Use a shovel or scoop to remove all bedding from the coop floor and nesting boxes. Place it in a bucket or wheelbarrow. If you have a garden, there’s no better use for old bedding than a compost pile. Learn more about what to do with all that chicken poop in my What to Do with Chicken Poop and Coop Waste (Beginner Guide). Step 3: Scrape and Brush Surfaces After removing bedding, you will notice stuck droppings and debris. Use a scraper or brush to loosen anything stuck to the coop floor, roosting bars, and nesting boxes. This step makes a big difference in cleanliness. Step 4: Clean and Rinse Lightly spray down surfaces with water, then apply a mild cleaning solution. A simple 1:1 ratio mix of water and vinegar works well for most backyard coops. Or you can purchase a specially formulated chicken coop cleaner and deodorizer. Avoid harsh chemicals, as chickens are sensitive to strong fumes. Step 5: Let the Coop Dry Completely This step is the most important for maintaining your chickens’ health. Do not add new bedding until the coop is fully dry. Moisture is the main cause of odor and bacterial buildup. 💡 Important Tip Never put fresh bedding into a damp coop. Dry conditions are the key to controlling smell and keeping your chickens healthy. Step 6: Add Fresh Bedding Spread a fresh layer of bedding across the coop floor and inside the nesting boxes. Most coops do well with about 3 to 4 inches of bedding. Bedding should be deep enough for your hens to scratch around, rearrange, and roll around in. Once a week, scoop out soiled bedding and refill to the proper depth. Change out the bedding completely every 2 to 4 weeks, depending on how soiled it is. To make cleaning easier, consider purchasing nesting mats. These reusable mats are easy to clean and durable, helping prevent hens from scratching the bedding material out of their nesting boxes. Step 7: Return Your Chickens Once everything is dry and fresh, let your chickens back into the coop. They will usually start scratching around right away. Weekly vs Monthly Cleaning Routine 🗓️ Task 🧹 What to Do Weekly Remove droppings and add fresh bedding Monthly Remove all bedding and deep clean coop Common Mistakes When Cleaning a Chicken Coop Cleaning mistakes can create more problems than they solve. One common mistake is skipping cleaning for too long. This leads to odor, flies, and unhealthy conditions. Another mistake is using too much water. Excess moisture can soak into wood and make the coop harder to dry. Always let the coop dry completely before adding new bedding. The best plan of action is to clean the coop early in the morning and keep the chickens out in the run, or let them roam in the yard before putting them up for the night. Some beginners also use strong chemicals, which can harm chickens. Your best bet is to use a 1:1 vinegar-and-water solution to clean and disinfect your chickens’ home. How to Keep Your Coop Clean Longer There are a few simple habits that make cleaning much easier. If you want to improve your setup, check out our chicken coop bedding guide, which explains how bedding affects cleanliness. Frequently Asked Questions How long does it take to clean a chicken coop? A full cleaning usually takes 30 minutes to an hour, depending on coop size. Can I use bleach to clean a chicken coop? It is not recommended for routine cleaning. Mild solutions like vinegar are safer. What do I do with old bedding? You can compost it or dispose of it with yard waste. Why does my coop still smell after cleaning? This is usually caused by moisture or poor ventilation. Final Thoughts Cleaning a chicken coop does not have to be difficult. Once you follow a simple routine, it becomes quick and predictable. A clean coop
Chicken Coop Bedding Guide for Beginners
Disclosure: This post may contain affiliate links. If you purchase through these links, I may earn a small commission at no extra cost to you. If your chicken coop smells bad or looks messy, bedding is usually the reason. Most beginners don’t think much about bedding at first, focusing on the coop, the chickens, and the feed. Then, after a few weeks, the coop starts to smell, the floor gets damp, and eggs show up dirty. The good news is that this is an easy fix. Once you understand how bedding works and what to use, keeping your coop clean becomes simple and predictable. What Is Chicken Coop Bedding and Why It Matters Chicken coop bedding is the material you spread on the floor of your coop and inside nesting boxes. It does more than look nice. It keeps your flock comfortable, warm, and healthy. Good bedding absorbs moisture from droppings, controls odor, and helps keep your chickens dry. It also makes cleaning much easier because you are removing bedding instead of scraping waste off hard surfaces. Plus, if you are a gardener, using the mucked-out straw is one of the best things you can put in your compost pile for later garden fertilization. If you are still setting up your coop, make sure you start with the basics in our Complete Beginner Guide to Raising Chickens, which walks through everything you need before your birds arrive. When bedding is wrong or poorly managed, problems show up fast. Not only do you get strong smells, but you get wet spots, flies, and a higher risk of illness in your flock. When you get your coop right, your entire setup runs smoother. Best Bedding Options for Backyard Chickens There is no single perfect bedding option, but a few work well for beginners. Pine Shavings (Most Popular Choice) Pine shavings are the go-to bedding for most backyard chicken keepers. They are easy to find, affordable, and do a great job absorbing moisture. They also help control odor better than most other options. Pine shavings work well on coop floors and inside nesting boxes. They are lightweight and easy to remove during cleaning, antimicrobial, and easy to find. Avoid cedar shavings. Cedar gives off oils that can irritate a chicken’s respiratory system. Straw Straw is another common choice, especially in rural areas where it is easy to find. It provides good insulation and works well in colder weather, and chickens also like to scratch through it. The dry, hollow stems of straw absorb moisture well and are a good insulator, keeping nesting boxes dry and comfortable. This moisture-wicking keeps eggs clean and free of mold and bacteria. Straw also protects hens and their eggs from extreme cold temperatures. Hemp Bedding Hemp bedding is becoming more popular, especially for small backyard flocks. Its softness, absorbency, and moisture control make it a good choice for nesting boxes. It is also low-dust and lasts longer than pine shavings, meaning less cleaning. However, hemp is considerably more expensive and harder to source locally. If you want a low-maintenance setup and do not mind spending a little more, hemp is a strong option. Sand (Advanced Option) Some chicken keepers use sand instead of traditional bedding. Sand drains well and does not hold moisture like wood-based bedding. It is easy to clean by scooping droppings the same way you would clean a litter box. However, sand is heavy and can be difficult to manage. It also gets cold in winter, which may not be ideal in colder climates. For most beginners, sand is not recommended for beginner backyard chicken farmers. But if you have a little more experience or are willing to deal with the learning curve, it can work well in dry areas. Bedding Comparison 🐔 Bedding Type 👍 Pros ⚠️ Cons ⭐ Best For Pine Shavings Absorbent, controls odor, easy to find Needs regular replacing Most backyard setups Straw Cheap, good insulation Can mold, not very absorbent Cold climates Hemp Very absorbent, low dust More expensive Low-maintenance coops Sand Drains well, easy to clean Heavy, cold in winter Dry climates Bedding for Different Areas of the Coop Not all areas of your setup need the same bedding. Coop Floor The coop floor needs bedding that absorbs moisture. controls odor, and provides cushioning for your flock. Pine shavings or hemp work best here. Aim for a layer about 2 to 4 inches deep so it can handle daily droppings. Nesting Boxes Nesting boxes should be soft, clean, and dry. Straw or pine shavings work well. The goal is to cushion eggs and keep them clean. Check nesting boxes often and replace bedding when it becomes dirty or damp. Chicken Run Most chicken runs are bare dirt, but that can turn into mud quickly. Adding sand, mulch, or a layer of straw in problem areas can help control mud and improve drainage. How Much Bedding Do You Need You do not need to overthink this. A few inches of bedding on the coop floor is enough for most setups. Too little bedding leads to moisture buildup, and too much just wastes material. Start with about 2 to 4 inches and adjust based on how quickly it gets dirty or damp. How Often Should You Change Chicken Bedding A simple routine keeps everything under control. Light Cleaning Once a week, remove obvious droppings and add a small amount of fresh bedding. This makes the weekly cleaning task much easier and keeps the coop from getting out of hand. Full Cleaning About once a month, remove all bedding and replace it with fresh material. If you notice strong smells or damp spots sooner, you may need to switch to a bi-weekly cleaning. If you want a step-by-step walkthrough, see our guide on How to Clean a Chicken Coop (Step-by-Step for Beginners), which breaks down the process in detail. 💡 Beginner Tip If your coop smells bad, it is almost always a moisture problem, not a bedding problem. Improve airflow and keep