
Roast a Chicken – The Better Way
 The Backyard Chicken Farmer Recipe Corner wouldn’t be complete without instructions for how to roast a chicken the better way. Or what I consider the better way.
I learned how to roast chicken from my grandmother, who lived most of her life on my grandfather’s chicken farm. This was a small local farm where all the animals were cared for and raised humanely, unlike the huge commercial farms today. We always had fresh eggs and chickens raised organically, without synthetic growth hormones and antibiotics.
Chicken and fresh eggs were a staple cooking ingredient on the farm, but my all out favorite dish was the Sunday roast chicken dinner. That golden, crusty delicious goodness was a family tradition handed down for generations.
To this day, I continue the tradition and follow Grandma’s most important instruction: “Keep it simple, follow my instructions exactly, and your family won’t want anyone else’s roast chicken.” Boy was she right.
What Tools You Need to Roast a Chicken
There are 3 must have items to roast a better chicken. Without these tools, your chicken isn’t going to turn out the way it’s supposed to.
Roasting Rack
Roasting Pan (large enough to hold roasting rack)
Cooking Twine (use twine made for cooking)
When choosing a roasting pan and rack, pick the best you can afford. If you can spend the money for a better set, you will be glad you did.
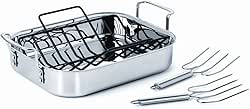
Calphalon Roasting Set
I use the set by Calphalon. It is tri-ply stainless steel with a non-stick rack and provides great even heating. The roasting pan is a workhorse. Just make sure to follow the instructions when using it.
Let’s Start Roasting
- Let chicken set at room temperature for 45 minutes to an hour before cooking. Putting chicken straight from the refrigerator to the oven toughens the meat and adds considerable time to the cooking. Remove giblets, if any, from chicken cavity.
- Preheat your oven to 450° F.
- Never wash your chicken. Whether you buy your meat from the butcher or you process your own, your chicken was washed before packaging, or at a cleaning station similar to what we use when butchering. That initial wash is all you need. For properly cooked chicken, your meat comes to 165° F which kills any bacteria or germs. Washing chicken in your kitchen spreads germs to the sink, countertops, utensils, and yourself, so avoid washing or rinsing your chicken.
- Thoroughly dry your chicken, inside and out. Start by patting the outside of the chicken with 2 or 3 paper towels, making sure you get as much moisture as possible off the meat, then discard towels. With 2 or 3 clean paper towels, dry out the chicken cavity. This step is essential for a properly roasted bird. By not removing as much moisture as possible from the inside and outside of the chicken, creates steam which dries out your chicken.
- Sprinkle kosher salt and ground black pepper inside the chicken cavity, about a ½ teaspoon of each. Take a sprig of fresh rosemary, about 3 inches long, cut in half, and add to the cavity. I occasionally add 1 or 2 cloves of garlic to the cavity, but usually I just use salt, pepper, and rosemary (I like rosemary in just about everything). You can put anything you like in the cavity, but I believe the simpler, the better.
- Now your chicken is ready to truss. Trussing is not necessary but it helps promote even cooking, making a better roast chicken. Next time I roast a chicken, I plan to take pictures of each step of the trussing, but for now I hopefully can give instructions in an easy to understand way.
- You need some cooking twine. I buy mine in a 500 foot cone which costs about $5.00. Be sure your twine is specifically made for cooking.

500 Foot Cone of Cooking Twine
- Lay your chicken on a cutting board or baking sheet with legs facing away from you and the breast side up.
- Place twine underneath the tail, making sure the twine is centered. Bring twine up and around legs, near the end, cross the ends of the twine and loop back under legs and pull the string tight to bring the legs close together.
- Keeping hold of the string ends, turn the chicken over, bring the twine around the sides of the chicken. Tuck in the wings and pull twine tight at the neck and secure using a butcher’s knot by looping the string through the knot twice. Tighten twine and cut the loose ends off.
Here is a video made by Ronnie Woo. He does an excellent job of showing how to truss a chicken with and without kitchen string. I recommend the kitchen string method since the chicken can pull apart while cooking.
- Flip chicken back over and sprinkle with salt** and pepper, making sure to season entire chicken.
**For salting the outside of the chicken, you need ¾ teaspoon of salt per pound. For a 4 pound chicken, you need 3 teaspoons of salt. I know this sounds like a lot, but trust me, it turns out great. Use pepper to taste. I normally use 1-2 teaspoons of ground black pepper.
Do not pour salt over the chicken. Add the 3 teaspoons of salt and pepper to a small bowl and sprinkle salt and pepper over chicken using your fingers. You want to make sure the chicken is evenly coated.
- Place roasting rack in baking pan and lay chicken on rack, breast side up. I highly recommend using a roasting rack for even cooking and to prevent chicken from sticking to the pan.

- Place chicken on center rack of hot oven and cook for 50 to 60 minutes or until internal temperature at thickest part is 165° F. Thickest part of the chicken is the junction between the breast and thigh. Do not overcook as this will cause your chicken to dry out and lose flavor. There is no need to baste the chicken when following these instructions.
As tempting as it may be, do not open the oven door until the 50 minute mark to check the temperature. Opening the door during roasting increases the cooking time and dries out the meat.
- When the chicken is cooked, remove from oven. Take chicken off the roasting rack and place on a cutting board, breast side up. Let chicken “rest” for 15 minutes before removing twine and cutting. This allows the juices to soak into the meat and enhance the flavor.
For yummy chicken and vegetables, wash and chop vegetables and place in mixing bowl. Drizzle with olive oil, add seasonings of your choice and mix until all vegetables are coated. Spread evenly over bottom of roasting pan and set roasting rack with chicken over the top.

Sounds yummy. I’m trying your recipe tonight.
Thanks Lisa,
I think you will like it. The skin gets nice and crispy with the meat still being juicy. Sometimes simple is just better.